We draw a horse step by step. How to draw a real horse with a pencil step by step for beginners and children? How to draw a beautiful horse's face, mane, running, standing, jumping horse? Courses for the development of intelligence
Today we will continue the series of lessons on drawing animals. We already know how to draw a wolf, a dog and a cow. Now we will teach you how to draw a horse with a pencil step by step. After all, if you think about it, in the Middle Ages it was impossible to do without these living taxis. They served as both passenger and cargo transport. What can we say about cavalry, without which not a single army in Europe could do in those days. In addition, horses are amazingly smart, both in their own right. working life, creatures. They understand their owner very sensitively and listen to him. Well, mustangs have become one of the symbols of disobedience and free character.
And so let's start drawing our horse friends!
STEP 1. The first thing you need to do to learn is to draw the basic line of the horse's body. You can achieve this by making three circles, one each for the head, chest and rear end. Then add auxiliary lines that will connect them all, starting from the neck, back, belly, tail and legs.  STEP 2. Now you can start sketching out the shape of the horse's head and nose as you see here. Also draw the mouth opening exactly as in the drawing, so that your stallion has a look of rage on his face. Start sketching out the neck, and muscles on the front leg or shoulder.
  STEP 3. We continue our lesson, how to draw a horse with a pencil. Let's start drawing the horse's head, adding ears and the beginning of the mane. Once this is done, you can do the back of the neck and then the curve of the back. Next we draw in more detail the eyes, nostrils and teeth. Perhaps our lesson on how to draw a mouth will help you.
 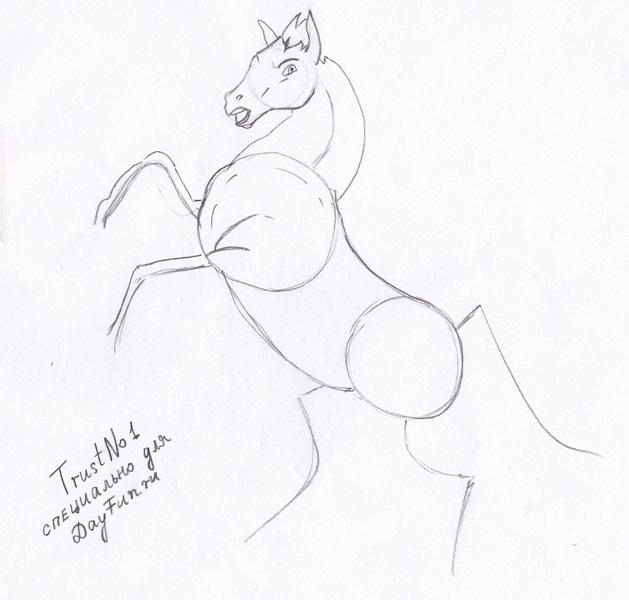 STEP 4. It's time for the real fun to begin. It's time to draw the horse's mane. Since this stallion is in an aggressive position, you will need to make his mane to make him look wild. A few sharp edges will give this effect. Next you should finish sketching out the front legs, and then the hooves. You should also draw the stomach, and the beginning hind legs.
  STEP 5. You're almost there guys, just a few more steps to work. Start sketching out the back legs in full shape, and then add one more thing that makes him look like a stallion (gee-gee).
  STEP 6. Lastly, draw the tail of the stallion and then add some minor muscle features like in the picture. Erase the auxiliary lines and shapes you added in the first step to clean up this drawing.
  When you're done, you should have a sketch that looks just like the one you see here. All you need to do now is add color. I hope you enjoyed this tutorial that taught you, . Follow our website, here you can find interesting drawing lessons every day. Leave comments and show off your work. You can copy from the picture that I gave, or look on the Internet pencil drawings of horses and try to draw a horse yourself.

Learning to draw a horse is quite a difficult task, since it requires an accurate representation in the drawing of the proportions of this most beautiful and graceful animal. But, if you draw a horse step by step, then it is quite possible to draw it correctly even for children. In this lesson, we will learn to draw standing horse, step by step, drawing out its outlines. It is difficult even for an artist to draw a picture of a running horse, so first make a drawing of a horse standing motionless, and after this lesson you can try to draw other drawings of horses, including a running horse. The most complex elements of a horse's drawing are the horse's hind legs and head, pay attention to these details Special attention. The site has a lesson on how to draw a horse's head step by step with a simple pencil. Check it out too, it will help you right draw a horse.
1. How to draw a horse, first drawing step

All drawing lessons on my site are based on the use of geometric shapes as the initial outlines of any animal drawing. Horse drawing done in the same way. Using three circles, draw the main parts of the torso and connect them with lines, as in my drawing. Drawing these contours is not difficult, but it is important to accurately position them on a sheet of paper in relation to each other. Try to do this step of drawing a horse as accurately as possible.
2. Add the outlines of the legs to the drawing

In this step you need to draw the outlines of the legs, neck and head. Start at the horse's neck line. To do this, you just need to add another top line of the neck to the one already drawn. Mark in the drawing with a small circle where the horse's head will end. After this, you can start drawing the contours of the legs. Start drawing the front legs first. To do this, draw two pairs of small circles and connect them with straight lines. Instead of hooves, draw triangles. The hind legs are more difficult, perhaps because they bend backwards rather than forwards. And pay attention, the lines of the legs do not start from the center of the circle, but are slightly shifted to the left.
3. General outline of the horse

Check carefully that the horse's proportions are correct. Isn't it too much big head And short legs? Are the hind legs bent backwards? Check the distance between the hooves, the front legs are almost closed, and the hind legs are standing as if the horse is preparing to run. If you are sure that you have drawn everything accurately, then move on to the next step.
4. The horse drawing is almost finished

At this step we won’t draw anything, just remove the extra contours from the drawing now. Correct the lines you accidentally deleted and see how easy it is draw a horse. Already at the third drawing step you have a real a beautiful horse, all that remains is to draw the tail and draw the head in detail.
5. It remains to draw a few more details

The first steps of the drawing are very simple, but require attention to ensure that the initial outlines are accurately positioned in relation to each other. The proportions of the horse depend on their location. The following steps require attention to small details. You need to carefully draw the eyes, nostrils, and ears of the horse. To draw small details, the pencil must be sharp. Don't forget to draw the tail.
Horse head drawing video.
6. Finishing touches of the drawing

You now know how to draw a horse, but you still need to learn how to apply shadows. This is a complex technique, but use a simple rule for lighting your subject. The light is coming from the right, which means the areas on the left will be darker. Try creating shadows on the horse by copying them from my drawing. You can try to draw a horse with colored pencils and even paints.
In this lesson we used techniques for drawing a horse that stands still. If you want to draw a running horse, or even several running horses, you can use photographs of horses to do so, using this tutorial as a base for other horse drawings.
7.Running horse. Oil painting

I painted this picture of a running horse with a rider in oil. Please don't criticize too much, I was only 11 years old.
To draw a horse, even step by step, you need experience and a good eye. But if you need to make horse drawings, this tutorial will help you figure out how to draw a horse head. The main thing is to accurately observe the proportions so that the horse’s head is graceful and beautiful. For beginners, I advise you to periodically compare your drawing with a real photo or a good drawing of a horse.
Drawing a giraffe will not be a difficult lesson for you if you have previously tried to draw a horse. Almost the same body structure, only the legs of a giraffe are slightly longer than those of a horse, and of course very Long neck. But if you draw it step by step, first with a simple pencil, and then color it with colored pencils, the picture of the giraffe will look like a real one.
If you draw wolves in the distance chasing a horse, you get a good subject for a picture of a running horse. In fact, wolves will not be able to catch up with a healthy and strong horse, and even if they do, they will regret it. The horse has a weapon that is very dangerous for them - its hooves.
The appearance of a deer is very similar to a horse, so if you know how to draw a horse, then drawing a deer will be easier. The structure of the body and legs is the same, only the head is decorated with horns and the tail is very small, it is not even visible in the picture.
If you were unable to draw a horse beautifully, try drawing a camel step by step. This lesson is made so that any child can draw a camel correctly.
This lesson will describe in detail how to draw a horse step by step with a pencil. Simple steps will allow you to draw a horse beautifully even if you have never drawn. Prepare the materials necessary for drawing and we can get started! As a result, we will get a drawn horse like this.
The easiest way to draw a horse is to learn how it works. After this, you can easily draw the base, as in the picture below. We outlined the chest, thigh, base of the head and legs of the horse.

Next, focusing on the base, we begin to draw the body shape of our horse. First of all, let's draw the shape of the neck. Notice how the horse's neck widens closer to the body, and it's also worth spending ample time studying the curves. If you draw from a photo, then it will not be difficult for you to observe the position of the horse’s neck.

Now let's add auxiliary lines to our base. I draw two lines near the head, they will indicate the location of the horse's eyes and nostrils. We divide the legs into rectangular sections to make it easier to draw later.

Focusing on the previously marked lines, we begin to draw the horse’s head. On top we will need to draw her ears, then we will need to mark general shape heads.

Now that the head is ready, we begin to carefully draw out the shape of the horse’s belly and hips. Having a pre-drawn base makes painting much easier.


Horses look amazing with their gorgeous tails and manes, so don't forget to draw this important detail. I also add some folds and strokes to the horse's body.


1. Three circles for the outline of the horse's head

When drawing step by step, it is important to draw the first contours correctly. The proportions of the future picture will depend on their location. For the future drawing of the horse's head, draw three circles with a pencil. The top is the largest, the bottom is the smallest and in the center is the middle one. Try to exactly copy their location from my drawing.
2. Initial outline of the horse's head

Trace the outline of the horse's muzzle without pressing too hard on the pencil; you may need to adjust these outlines. And in the big circle, draw a small circle for the horse's eye.
3. Horse's ears, nostrils and neck

Draw the ears on the top of the horse's head.
Outline the neck and add nostrils in the drawing and draw a lip line. Remove excess contour lines from the drawing.
4. To control a horse you need a bridle

Every horse has a bridle with which it is controlled. And only in the wild or in a fenced paddock do horses run without it. First draw a small ring at the edge of the lips and a leash sticking out of the mouth. Also, at this stage, add some details to the horse's head drawing. Draw the mane, specify the shape of the eyes and nostrils.
5. Draw the entire frenulum

At this stage, draw the full bridle and add details to the horse's ears. After this we can say that horse head drawing almost finished.
Horse head drawing video.
6. Apply shadows on the drawing
To make the horse’s head three-dimensional and the picture to look like a real artist’s, you need to add shadows to the drawing with a soft, simple pencil. There is no need to color the horse with colored pencils, but making shadows with a simple pencil will not hurt at all.
Learning to draw a horse is quite a difficult task, since you need to accurately convey the grace of this animal. But, if you draw a horse step by step, then it is quite possible to draw it correctly even for children. In this lesson, we will learn how to draw a standing horse, drawing its outlines step by step.
A deer's body shape is very similar to a horse, if you can draw it correctly, then you will not have a problem with how to draw a horse. In a position where the deer is alarmed by something, its legs should be slightly bent, ready to jump.
An elephant has one easy part to draw - its legs. The elephant's ones are very large and even, like pillars. But drawing a horse is very difficult, mainly because of the complex shape of the legs. On a horse they are curved backwards. In this lesson we will learn how to draw an elephant with a pencil.
The giraffe, of course, is not at all like a horse, although it is also considered an artiodactyl animal. And that’s probably why, if you look closely, it’s easy to see that a horse and a giraffe have a lot in common.
It will be easy for you to draw a camel if you repeat exactly simple steps this lesson. And if you have already drawn a horse before, this will help you more accurately maintain the proportions of the drawing.
Horses were trained more than 5 thousand years ago, and since then these animals have made life easier for humanity. Previously, they were mainly used as transport and in arable work. Horses are now used for treatment neurological diseases(hippotherapy). Their calm and friendly energy has a positive effect on even the most hopeless patients. A drawing of a horse will give you confidence and hope. If you want to please a person, give him a drawing of a horse.
How to draw a horse for kids
Draw an elongated horizontal oval (torso). To its right end, draw a smaller oval; it should be located at a slight angle (neck). At its end, draw a small circle (head) and half an oval (muzzle). On the right side of the body, draw a semicircle (the horse’s croup).
Draw ears on the head. Draw the horse's legs. The front legs are drawn by connecting the ends of 2 parallel lines. For the hind legs draw 2 corners.
Mark the position of the tail and mane. Outline the hooves. Draw the eyes, nose and mouth of the horse. Make a fluffy tail and shade the hooves.
How to draw a horse step by step

First outline the base of the horse. Draw 3 circles (chest, rump and head). Connect the circles with lines to indicate the position of the legs.
 Draw a nose and mouth on the horse's face. Start drawing the neck and muscles of the right front leg.
Draw the eyes, ears and the beginning of the mane. Now you can apply the back of the neck. Thicken the legs, work the nostrils and mouth.

Starting from the ears to the end of the neck, draw a zigzag line (mane). Draw the hooves for the front legs. Mark the beginning of the hind legs.
 Draw the hind legs and hooves, draw the stomach.
  Draw a fluffy tail for the stallion. Add lines to represent the muscles.
  Erase the auxiliary lines.
How to draw a horse with a pencil

Draw a rectangle in the center of the sheet. Its dimensions determine the size of the horse's body and legs. In its upper part, draw an oval, elongated horizontally (front legs and rib cage), and an oval, elongated at an angle (the base of the hind legs).

On the upper left corner draw a triangle (neck), just below its top - a circle, on the side of the circle - a square (head and muzzle). Draw 2 straight lines on the left under the large oval (front legs), under the smaller oval draw 2 inclined lines (hind legs). Draw circles on the legs, indicating the joints. And complete the legs with triangular hooves.

Outline the outline of the torso. Start drawing out the hind legs by drawing an inverted triangle on the back of them. Using the drawing as a guide, shape the front and rear legs by connecting the edges of the joints and hooves with straight lines.
Connect the bottom of the square, circle and triangle with a smooth line. Draw a line at the top connecting the square and the circle to create the horse's head, add an ear, and give a curved shape to the neck.
Outline the horse's chest and belly.

Draw a circle with a pointed top on the horse’s head (eyes), a curve with a slight bend on the muzzle (mouth), and a small circle (nostrils). In place of the hooves, draw a parallelogram, and then erase the upper right corner of each.
Shape the tail and mane. Outline the torso again.
 Remove the auxiliary lines.
How to draw a horse step by step with a pencil

Draw a small circle (the head) in the center of the sheet. From it, at an angle in different directions, draw 2 lines of approximately the same length. At the end of the right line, draw an arc (body), at the end of the left - a small circle (nose).

Connect the circle and the arc with 2 lines (neck) Connect the head and nose with 2 lines. Mark the beginning of the chest with a “bird” turned to its side.
 Mark the position of the nostrils, eyes, ears. Erase the extra line on the body.
  Add details to the face, eyes and start drawing out the mane.
  Draw the outlines of the horse's main muscles. If you have any difficulties with this, copy them from the sample.
  Mark shadow areas.

 Outline the location of the shadows using light shading.


 Take a soft pencil and add contrast to the shadows.
Blend the surface of the horse with cotton wool. The horse's shading will become more uniform, and the piece of cotton wool will darken. Using this cotton wool, moving over a clean surface, apply the background horizontally.
How to draw a horse beautifully

Draw a circle (head), and on it draw a trapezoid (muzzle), mark the base of the ear. Draw a slightly curved line down (neck). From the neck, draw a large oval (torso). Outline the position of the tail, hind and front legs with hooves.

Draw in one line, without lifting the pencil, the shape of the muzzle, head, and neck. Draw an eye and an ear, draw a line for the lower border of the neck and chest. Add detail to the legs and tail.

Draw the nostril, the tip of the second ear, outline the cheekbones and lower jaw of the horse. Draw the mane, outline the body of the horse, and work on the legs with hooves.
 Add naturalness to the horse by painting its tail, mane and spots on its body.
 You can paint the horse, and you will get the owner of the prairie - the mustang.
How to draw a horse with wings, or otherwise Pegasus

Draw a circle (head), below a smaller circle (muzzle). Connect them with lines and outline the ears. Draw a vertical oval (the base of the hind leg) and several more circles (3 for the knees, 4 for the hooves). Draw a large horizontal oval (body) and the outlines of the wings.

Draw almond-shaped eyes and a nose. Start drawing the mane and tail. Give shape to the legs and torso. Work on the wings, marking the approximate direction of the feathers.

This stage is simple, but very labor-intensive. Draw the outline of the muscles on the horse. Shade the horse's tail and mane. And start drawing large and small feathers on the wings of Pegasus.
 Erase all auxiliary lines.
  And color the drawing with paints.
How to draw a horse video
If you still don't understand how to draw a horse, watch the video. This video has several stages. The horse ends up being very beautiful.
Horses pictures drawn


