How to draw a drawing of 3 white horses. How to draw a horse. We draw quickly and beautifully
Horses are graceful and graceful animals. Artists know that it is difficult to convey these qualities in a drawing. But if you learn some tricks, it won't be difficult. We have selected interesting instructions for you that will tell you how to draw a horse step by step, easily and beautifully.
We draw quickly and beautifully
You should start with instructions that will show you the basics of drawing. You can use all the skills acquired in this example in practice if you need to show how to draw a horse to a child. Instruction is also suitable if
To make the instructions really simple, we will use only a simple pencil and an eraser. Let's get started:
- Let's draw an animal's eye. It has the shape of a petal.
 We place a small pupil inside and leave a barely noticeable glare. On the left side of the eye we draw a curved line for the muzzle. Add a triangle - this is the nose.
 - We wrap the previously drawn line at the bottom to create a mouth. We depict from him bottom part heads. We depict the nostril of a horse.
- At the top of the head we will draw a triangular ear.
 Since it is turned sideways towards us, we use a triangle with an acute angle. Near the ear, using zigzags, draw the beginning of the mane.
 - From the bottom of the head we will derive long neck. Now you can draw the front part of the leg. Add a triangular hoof and complete the drawing of this leg with a second line. In front of this leg we add a second one. She will only peek out, so one feature and a hoof are enough.
- Let's go back to the top. Using smooth lines we depict the long mane of the horse. We connect the space between the lines with zigzags.

- From the end of the mane we draw back animal body. Let's make it round. Let's draw the hind legs. Note that these pieces on the back are angular in shape.
- Let's draw the tail and add a few additional details. Select on the muzzle and the bottom of the hooves. They will have a different shade.
We figured out how to draw a horse step by step easily and beautifully. Using this example you can draw other pictures,
Julius the heroic horse from the cartoon
Surprising a child with an ordinary horse is not so easy. That is why we have selected instructions for you that will tell you how to draw a horse step by step for children. And we will portray Yuli, the heroic horse.
For drawing we will use: black felt-tip pen, brown orange gouache, brush. Let's get to work:
- We will draw the silhouette of Yuli with a black felt-tip pen.
 Draw round eyes. We place them nearby. Add black pupils and draw eyebrows at the top.
 - From the central part of the eyes we draw a curved line for the nose. Next we add another stripe. Towards the end, draw the nostril in the form of a seed and draw an arc above it. Draw the mouth, it should be wavy to form a smile.
- Draw the lower part of the head. We add an ear, which we make in the form of an inverted seed. Above the right eye we will draw the horse's bangs.

- Let's go down. Using two stripes we draw a long neck. Since this is a cartoon character, it should be thinner than that of a real horse.
- We draw a wide arc from the back of the neck. It goes to the back of the body. Here you need to depict the horse's pelvis. Starting from it, we will depict one hind leg. This part also has its own nuances.
The shape is repeated, like a realistic animal, but in Julius it is much more subtle. Using semicircles we depict large hooves. - We draw a line for the abdomen and draw the front legs. One leg located closer to us will be bent at the knee. Draw a triangular shape without sharp corners.
 Complete the second part and add the hoof. Let's bring out the second leg. All that remains is to add the horse’s mane to the left side of the head. At the back of the body we will draw the silhouette of a tail.
 - You can move on to coloring. We will use gouache. Let's paint the horse itself with brown paint. Let's make the mane and tail orange.
Shade the hooves with a black felt-tip pen.
Ready. We told you how to draw the horse Julius step by step for children. Well, for older children, you can use the following complicated instructions.
This lesson differs from the previous ones in that as a result of hard work, you can get an image of a realistic animal. We will use a regular HB pencil and eraser.
Let's try to draw a horse with a pencil step by step for children:


The work is done, now you can draw a horse with a pencil step by step for children.
Painting with oil paints
We looked at several examples of drawing based on a pencil. Now the site offers a lesson that will tell you in detail how to draw a horse with oil paints.
What you will need for work:
- a simple pencil;
- canvas for drawing (can be replaced with thick paper);
- brushes of different sizes;
- palette;
- water;
- rags;
- easel or tape.
Before painting, set up your canvas on an easel. This will help you draw more easily. If you are using plain paper, secure it to the work surface with tape. The tape will not allow it to go beyond the frames and will prevent the paper from moving when drawing.
Let's move on to drawing:
- Using a pencil, draw a sketch of a horse on canvas.
 You can do this by following one of the instructions above. In our case, only the head will be depicted
 - When the sketch is ready, you can start working with paints. Mix white, a little black and blue. Paint the entire surface of the canvas. We don't touch the horse.

- At the next stage we will color the horse. Let's start with the dark areas. Let's do the nose, lips, eyes and internal part ears. Mix white with black. We outline the nostrils with the resulting color. And with smooth strokes we begin to move towards the tip of the nose and its apex.
The nostril itself should be painted over with a color one tone darker. Mix the colors and tint the remaining areas on the nose.
- Let's go up to the eye. We draw its contours and paint over the pupil, leaving a highlight. We make the remaining part light gray. Select the second eye and paint over the central details of the ears.
- We tint the mane with a light gray shade. From the eye we move in a solid line to the nose. Add a little brown to the color used. We paint the neck. We make the color lighter, shape the lower part of the head and add a few strokes to the area near the mane.

- Now mix a light gray shade. Apply it to the remaining unpainted elements. Using gentle movements, we combine it with the other paint in the drawing to get smooth transitions.
- Add a little brown to the roots of the mane. Mix colors for a beautiful and realistic look.
We have discussed how to draw a horse's head step by step in an easy and beautiful way.
Horse in the meadow
We continue painting with oil paints. If you had no difficulties drawing the previous horse, then the next one will seem easy to you.
For work we will need:
- canvas (preferably 18 by 24 centimeters);
- oil paints, colors: white, blue, ocher, cadmium yellow, cadmium red, pink, green, ultramarine, brown;
- paint thinner;
- synthetic flat brushes No. 14, 8 and 4;
- palette;
- oil can for thinner;
- rag for brushes.
If everything is prepared, let's get to work:
- First, let's lay out all the colors on the palette in a sequence convenient for you. Using a thin brush, pick up brown and dilute it with thinner and water. Use the resulting color to mark the height of the future horse. We determine which side the head will be on and also put marks.

- Carefully mark the lower back, back and withers. Draw a small arc for the stomach. Let's draw a groin line. Let's draw the lines of the horse's elbow and forearm on the front leg. Let's do the same with the far leg.
At the hind leg we will add a joint that helps the horse gallop. Draw the hair using neat lines. - Let's move on to the neck. Let's add a second line. Let's mark the muzzle; its length is equal to the length of the neck. Let us mark the horizon line and the hills in the picture, which we will place in the background.

- Take a medium size brush. We select blue color. Mix the paint with white and add a little thinner. Use the resulting color to completely cover the sky. Add ultramarine and pink. Apply additional shades to the sky.
- We add even more ultramarine and white. The resulting color. Make the paint layer thin. Add more whitewash and cover the distant hills. The bottom of the hill needs to be darkened, we use ultramarine and pink for this.
- Apply green paint. We begin to cover distant areas of the meadow. Mix green, yellow and ocher. Cover the foreground.

- Mix ocher with thinner and water. With the result obtained, we completely close the horse. Add brown to the color and mark the shadow areas.
- Take a small brush. Mix ultramarine and green, add a little white. We mark the trees in the distance with neat dots. Using simple green we mark the shadows under the trees. Add white and add shadows.
- If you wish, you can add clouds. Mix whitewash with water and thinner. Note the clouds.

- Let's move on to the horse. To emphasize it we use bright ocher. Let's paint the back, side and a little neck. We will cover the bottom of the neck, head, lower abdomen and legs in the background with brown color.
- Mix brown and white. Let's note the light details. They are located on the head, back, rear part of the body and tail. Using dark brown we detail the horse. Add whitewash and paint light strokes along the contours of the animal and on the tail. We carefully smear everything to get a smooth transition. Let's mark the eye with black color.

- All that remains is to draw the grass. Take a wide brush and paint strokes over the entire lower part of the picture. Use different shades of green. You can add white flowers.
Ready. This instruction for painting a horse with paints will be very complicated for a child, but for experienced artists it can be used in their practice.
There are many things you need to know before you can draw a realistic horse. You need to know about the horse's anatomy, how it moves. I present to your attention several steps to creating a horse. I would like to hope that I can help you draw the best horses in the world.
ANATOMY
I am firmly convinced that you cannot learn to draw well without knowing anatomy.
First I created a sketch of the horse skeleton. I kept in mind the structure of the horses, the joints of the bones, which allowed me to better understand how the horse was built. This drawing may help you.
Let's go further and look at the muscles of the horse. Understanding how the muscles are placed will help the horse become more realistic. Good accommodation musculature will give your drawing a sense of movement as opposed to simply drawing with a pose.

Horses have very large muscle groups. I only included some muscle groups in the main sketch. I suggest you sketch one or two muscles to understand the placement of the muscle and make it easier to work with.
One of the most big problems this is the definition of the musculature of the front legs. This sketch should help.
BREEDS
Over the centuries, humans have developed hundreds of specialized horse breeds. We have horses for pulling carts, ploughs, horses for knights and heroes. There are also horses for racing. We have tiny breeds of ponies.
Each different breed of horse was created specifically to perform certain types of work.
Each breed is different from the other. Even the bones of some horses are larger and heavier than those of lighter breeds. Some horses have thicker necks, shorter hindquarters, etc. The manes of some are thick and often appear almost curly. Horses' tails are often trimmed.
This breed of horse is very hardy. Their hind limbs are usually very muscular and powerful. Of all the breeds of such horses, this horse is one of the fastest runners.

Arabian- perhaps one of the oldest and most beautiful breeds horses. Arabians raised in the desert are very hardy. Although they are not the fastest breed, Arabians are racing favorites who compete in races for their stamina. The Arabians were called "wind drinkers" because of their nostrils. They also have large, well-shaped ears and large eyes.

MOVEMENT
Most horses have four simple gaits: walk, trot, canter and canter. Look at the horses in motion
Step

Lynx

Canter

Gallop

Horses also have a wide variety of other movements. They move sideways, diagonally, they kick, they are playful.

DRAW A HORSE
I would like to point out that my lessons are aimed at someone who already has some drawing skills. I assume you already know a bit about the basics of sketching and the like, so I won't go into too much detail. Hopefully you are actually somewhat familiar with horse anatomy and know what kind of horse you want to draw.
We'll start with the head. This is the most significant part of the horse.

Pay attention to the eye socket. Notice that the teeth are angled and not parallel like in humans. Please note that the horse's jawbone runs under the ear and goes to the teeth and chin. The horse's head has many bones and appears heavy in the cranial area. The nostrils, lips, and chin are the softest areas on a horse's face. They are very active and expressive.
Horses are quite rounded creatures. So when sketching, start with circles or ovals. This is how I always start.
HEAD (side view)

Step 1
Looking at a horse's head from the side, you will notice that the cheek and muzzle are both fairly round parts of the horse. I start with them. First, I sketch out a circle that will become the cheek. Then I decide from what angle I would like to see the horse’s head. After this I will sketch the muzzle. The size of the muzzle should be approximately half the size of the cheek. This circle depends on the breed of horse you are drawing. Connect the mouth and cheek to what will become the jawline and forehead. Mark the line of the neck and outline the ears.
I like to draw eyes with small ovals. The eyes are usually located at a point approximately 1/3 the length of the horse's head from ears to nose.
This is the basic outline of the horse.

Step 2
Now I begin to draw the horse's face. I start with rough sketches, which can be easily changed when drawing the line further.
I offer you the option of creating a nostril, cheekbone and mouth line. I consider it a mistake not to designate the eyes, mouth, size and placement of nostrils, ears, etc. in the early stages.

Step 3
If you are happy with the drawing, it’s time to “revive” the horse. It's time to draw the details. It is at this stage that I add muscles, hair and character lines. But remember the anatomy. Don't forget to draw the area around the eye, the bridge of the nose and the jaw.

Step 4
Time to breathe life into the drawing...
Since the horse's head is entirely its skull, and the muscle covers it, it has the same shape. We know where her muscles are so we can decide on the shading. We know how the skull is formed and can give the forehead realistic hardness. Hopefully, now you see why I insist on studying anatomy!
HEAD (front view)
Drawing a head from the front is difficult. However, I hope that I can help draw her.

Step 1
I usually start drawing the front view with a rounded rectangle. This is the shape I imagine a horse's jaw to be. I then add a smaller rounded rectangle to represent the snout. Then I indicate the location of the horse’s eyes: 1/3 of the distance to the bottom of the “jaw”. Having marked the line of the eyes, I draw a circle that will become the horse's forehead and indicate the shape of the ears.

Step 2
I start drawing lines. I draw the horse's eyes. I use ovals to create the nostrils, and I create shadows on the head and ears. I also draw a line from the corner of each eye to a point between the nostrils and from the ear to almost the center of the horse's forehead. The resulting diamond-like shape will define the area of the horse's muzzle.

Step 3
Once I'm happy with the outlines, I start adding details. Everything is starting to take shape. This horse worked hard: I flared his nostrils. She is also quite alert, with her ears pointing forward. She looks animated and interested. She's ready for the finishing touches.

Step 4
I added a highlight to this horse's face (white area). I think it gives the horse character. Notice that it is in the "diamond" area (I showed it before). It is a hard area of bone covered by skin. Notice also that the horse's eyes are on the sides of the head, not on the front plane, and there is quite a large distance between the ears.
DRAWING THE TORSO
As I said, there are many round areas in a horse's structure. We can denote them with circles and ovals. This applies to the torso too.

Step 1
I prefer to start with areas that are closer to me. Since this horse is facing us, I started with chest, marking each half with ovals.
I also determined where the neck would meet the chest and moved from there to the head. When I had drawn most of the body, I moved on to drawing the legs. I wanted to spread her legs a little to soften the position. I outlined the knees, and the ankles I marked the leg with ovals.
Analyze the entire drawing. If you don't like him now, you won't like him in the future. Try changing details (leg position, etc.)

Step 2
I move quickly from step to step as I have been drawing horses for many years. You don't have to rush. The less you work on the sketch, the worse the character of the horse is indicated.
At this stage, I draw the shape that already existed for me. I start drawing out the muscles and facial expressions. I'll also add some hair and start playing with the background (but not today). This is a sketch for now. Nothing is permanent. Feel free to work with him. Get used to it. Do you like the way she looks? No? Change it.

Step 3
We've reached the cleaning stage. I'm defining the light source and playing with the shadow a little. I also clean all the lines. I am increasingly detailing the drawing. Now you can feel the muscles more. If you don't like something, go back...
Have you decided to teach your child to draw a horse with a pencil? Do you want to get creative, have you been drawn to paper and pencil for a long time? Have you heard that drawing helps get rid of stress, relieve fatigue and emotional tension?
Now you can draw a horse with a pencil without any problems! Horses with riders, jumping horses, beautiful running animals - everything can be depicted with ease if you remember a few useful tips and familiarize yourself with algorithms and diagrams. Start drawing today!
How to draw a horse with a pencil
403 Forbidden403 Forbidden
nginxDo you want to draw a horse step by step, delve into all the subtleties of the image of this animal? Try to remember the algorithm, look carefully at the diagrams. When you reproduce all the given patterns on your piece of paper, you will quickly have a spectacular horse.
- First of all, mark the boundaries of your drawing. Of course, it is better to immediately determine the rectangle in which the animal will be located. This makes drawing much more convenient.
- Now you need to draw the base of the future horse's head. To do this, draw a medium-sized triangle in the upper left corner of the picture. The corners of your triangle should be rounded. Do exactly as shown in the picture.

- Now you need to draw two ovals, positioning them relative to each other at an angle. They will later become the basis of the horse’s croup and chest.

- Connect your two ovals to create the horse's belly. Make the lines smooth, avoid sharp transitions and breaks.

- Now you need to work on the image of the horse's legs. First, mark the places where they bend with dots, and then connect your points with straight lines. Try to make the proportions of the horse's body harmonious, pay attention to the drawing. Remember that the horse's knees are quite high.

- Now you have to finish drawing the legs, make them quite muscular, full, draw the hooves. The heels are slightly raised, the hooves should be depicted in the form of trapezoids, the animal’s knees protrude slightly forward. For now, focus on the front legs.

- You can begin to finish drawing the animal’s hind legs. Remember that a horse's hind legs are much fuller than his front legs above the knee. If the front and back legs are the same in your drawing, the proportions will be disrupted.

- Draw the horse's neck. Here you will have to remember the golden mean in order to draw the horse correctly. The fact is that a neck that is too thin will look bad in the drawing, but an overly thick, massive neck will also spoil the impression of your horse. The neck should be quite powerful, but at the same time it is important to convey the gracefulness of the horse. To do this, you need to draw with smooth lines, be sure to indicate the transition from the body to the head, gradually making the neck thinner. Let it be slightly curved.

- Once again draw the torso, legs, neck and head of your horse.

- Take an eraser and remove all unnecessary lines left over from constructing the horse. Don't let them distract you. Erase the lines carefully, without leaving streaks or marks.
- Now comes the most interesting stage. You have to draw a horse's head. In this drawing, the animal stands in profile towards the audience. Try to make the muzzle more expressive. Draw the ears, mark the large nostrils. Be sure to make the horse's eyes big.

- It's time to draw your horse's tail. Sometimes the tails are cut, someone braids them and ties them with elastic bands. In our drawing, the horse’s lush, long tail flutters freely in the wind, which gives the drawing dynamism. You can immediately see that your horse is moving.

- Update your drawing again, removing all the extra lines and unnecessary strokes.
- Draw the horse's muscles. Outline them with strokes in the neck, back and front legs. If in doubt, completely follow the lines drawn in the drawing. A horse with such muscles will look more realistic and powerful.

- Now decorate your horse with a lush mane that is lifted by the wind. Remember that you shouldn’t try to draw every hair or curl. Just mark the line of the mane, give it volume, and with a few strokes you can divide the mane into curls.

- Add a few more neat strokes to indicate the bends of the joints on the horse's legs.

- Now you can make your drawing more voluminous. Use pencils and shade them. Notice in which places the horse is darker and in which places it is given lighter shades in the sample. Do the same.

All! Your horse is completely ready. You can color it and make a background.
How to draw a horse's head
403 Forbidden403 Forbidden
nginxOf course, in order to learn how to draw a horse correctly, it is important not only to remember the basic principles of depicting the animal, but also to understand the details.
It is important to draw the horse's face in such a way that it really looks as realistic as possible and immediately attracts attention. In addition, you will be able to create real portraits of horses in different styles and directions if you master the basic principles of drawing faces. Remember all the subtleties and follow the algorithm.

Your horse head is now ready! You can color it.
403 Forbidden403 Forbidden
nginxNow you will be able to draw a horse step by step and make its face especially beautiful. But this is not the limit of your capabilities! Create beautiful running, jumping horses and pegasus. For example, in this section you will learn how to draw a horse with wings. 
- The fairytale pegasus looks great and captivates with its impressiveness.
- It can become an emblem of courage and love, symbolize a flight of creative imagination or a passion for travel.
Remember exactly how to portray a beautiful pegasus.

Your Pegasus is already drawn! You can give it color.
403 Forbidden403 Forbidden
nginxThe animal with a rider looks especially impressive. You can learn how to draw a man on a horse right now. It is important to calculate the proportions correctly so that the rider looks realistic. Of course, you shouldn’t forget about the proportions of the horse’s body either.
If you look carefully at the sample and redraw the rider on the horse sequentially using an algorithm, you will definitely not have any problems. 
- Try drawing a horse and rider using ovals or rectangles. Draw one large rectangle that will be the base of your horse's body, and above it draw a smaller rectangle. Make sure that the top rectangle is at an angle, as an animal with a slightly bowed head looks more natural.
- Now draw the horse's neck. To do this you will need to connect the top and bottom rectangles.
- Take hold of the horse's legs. Look carefully at the drawing to depict the horse's legs as realistically as possible. Keep in mind that the legs are not completely straight and have different thicknesses above and below the knee. It is better to draw the hind legs slightly apart, draw one front leg bent and raised. Don't forget to draw the horse's tail.
- Now you need to draw a fairly large rectangle approximately above the middle of your horse's body. Make the rectangle vertical. This will be the basis for drawing the rider.
- You need to draw a small oval above the vertical rectangle. It will then transform into the head of a helmeted rider.
- Depict right hand person. One should be extended to the left. It is better to draw the other hand half-bent. Let the clenched fist be approximately between the horse's neck and body.
- Now draw the rider's leg. From our angle, only one leg is visible. It should be slightly curved.
- Now it's time to depict the details. First draw the rider's face. Make your eyes oval and add short eyebrows above them. Outline the nose with a wavy line, draw a mustache under it, and just outline the mouth with a small arc. Draw the beard.
- Draw the helmet, armor, and chain mail of your rider. The helmet will resemble a triangle, the continuation of the hat will cover the side of the face. Draw the armor, creating clear lines and geometric shapes, depict chain mail, large gloves covering the hands. Draw the armor on the legs in steps.
- Draw the horse's face. Draw the nostrils, the eye, define all the lines more clearly. Be sure to draw the ears, mane and tail.
- Now all that remains is to draw the stirrups and reins, the saddle, and the sword in the hands of the rider.
Your man on horseback is ready! You can leave the drawing in pencil and color it with colored markers.
403 Forbidden403 Forbidden
nginxHave you decided to draw a harnessed carriage?
- To begin with, it is better to learn how to depict a carriage with one horse. The main thing is that you understand the principle of drawing itself.
- Then you can draw a carriage with two or three horses again, or simply add one to the existing one. For example, o will be partially visible in the background: the front and hind legs behind the legs of the main horse, the head raised up, the tail, part of the back. And everything else will be hidden behind your main horse.
For now, let's draw the simplest option.

- Draw a large square with a horizontal rectangle next to it. These are the basics of a carriage and horse.
- You need to add a small rectangle to the square, on which the coachman will sit.
- Now get to work on your horse. Draw a small oval and then connect it to a rectangle. This will give you a horse's head. It's better to keep your head down a little.
- Draw the horse's legs. They should not be very thick, of medium length. Make the back ones slightly bent and the front ones straight. Draw the tail and mane of the horse.
- Draw the details of the horse's face. Draw the ears, eyes can be covered with overlays, outline the harness. One line should cross the horse's body diagonally, going towards the carriage. This is a shaft. Be sure to draw the hooves.
- Now we need to pay more attention to the carriage. It has a straight wall in front, but it is better to round the back. Look exactly how the carriage is shown in the picture.
- Add a window to the carriage. Don't forget to draw big beautiful wheels. Make the rear circles large, the front wheels noticeably smaller. Label the wheel axles.
- It is important to draw a coachman to give the drawing realism and dynamism. Picture a person sitting in front. We see him in profile. All you have to do is draw an oval, a small circle above it and a small rectangle on top. On the oval, mark the coachman’s hand with two lines. Add details to the top rectangle so that it looks more like a cylinder. Between the coachman's body and the hat, all you have to do is finish the hair and outline one eye with a small stroke.
- Carefully draw the profile of your coachman. It is enough to outline the nose and carefully round the chin.
- Now complete your drawing with the necessary details, strokes, and be sure to completely erase all unnecessary lines.
All that's left to do is color your harnessed carriage!
403 Forbidden403 Forbidden
nginxHave you decided to depict an animal in motion? Do you want to make the drawing truly realistic and dynamic? Then it’s worth drawing a horse on its hind legs! This design looks impressive and conveys the strength and power of the animal.

- Start your work by determining the location and boundaries of the drawing. It is better to unfold the sheet of paper vertically. The animal will stand on its hind legs, stretched out in length. If the picture is vertical, the horse on its hind legs looks more impressive.
- Draw one large vertical oval. Above it you need a smaller oval located on the side. This will give you the basics of the animal's body and head.
- Draw the horse's neck. It shouldn't be too thin. Let the horse look powerful and muscular.
- Pay attention to the horse's hips. The hips and upper legs are extended downwards. Study the drawing carefully to understand the principle of constructing lines.
- The lower parts of the legs are positioned differently. The horse stands on its hind legs; they are almost straight and elongated. The front legs should be depicted raised up. From the knee they go almost vertically, the hooves are slightly lowered. This will make your rearing horse as realistic as possible.
- Engage in transitions. Carefully round all the lines, outline the torso and legs. The lines in the area of the knees and hooves should be clearer.
- Draw the details of the horse's head. Draw a large nostril, an eye, one ear. The horse's muzzle is located in profile towards us.
- Don't forget to draw the mane, tail, and carefully draw the hooves.
- Use strokes to outline the muscles, the muscles of the horse. Paint over it a little, outline the folds of the skin on the stomach.
- Now erase all the extra lines.
403 Forbidden
nginxDo you want to draw her beautifully right now? You can easily create an original drawing if you remember the rules for depicting a horse in a jump.
- Draw step by step, constantly check the pictures. First you will draw two figures that will be the main ones in the drawing. Here they are greyish.

- Then start drawing the horse's head. It is lowered down and located vertically. Immediately draw the neck, complement the head with a graceful ear.
- Draw the horse's face more carefully. You will need to draw the cheek, nostril and eye of the animal, outline the jaws, convex lines around the eyes.
- Now it's time to draw the horse's body while jumping. Remember that all lines must be smooth. First draw the front legs. They are thinner and bent. The hooves and lower parts of the legs are practically pressed against the horse's belly. The animal is grouped in a jump, which must be emphasized in your drawing. The hind legs are extended. note that top part the hind leg is noticeably thicker than the lower leg.

- Now we need to detail the body. Outline the horse's muscles with symbolic lines and draw the hooves.

- Be sure to depict the tail and mane of your horse. Let the tail be thrown back a little.
- Erase all unnecessary lines and remove pencil marks.

Now you can color or shade your jumping horse!
403 Forbidden403 Forbidden
nginxDrawing a running horse is also not as difficult as it might seem. Remember the algorithm, carefully study the drawing. You will be able to draw everything step by step with a pencil. 
- Start your drawing by drawing two ovals. Let them be positioned horizontally. One will be approximately in the center of the sheet, draw the other on top, closer to the left edge of the paper.
- Connect your ovals to create the horse's neck. It should be strong, but not too thick. Make sure that the proportions are maintained.
- Start drawing legs. We can generally limit ourselves to the image of two legs - front and back, since from our angle the animal can be seen this way. The hind leg is more powerful, it is noticeably thicker above the knee. The front leg is slimmer. Draw the back leg extended back, the front leg should be extended forward.
- Now you need to detail the animal’s head, because for now it’s just an oval. Round the line of the cheeks, draw a graceful ear, make the muzzle narrowed downwards. Draw a large oblong eye, you can add a large nostril.
- Be sure to add a bushy ponytail pulled back.
- Now you need to remove all unnecessary lines, make smooth transitions, and outline the horse’s muscles with strokes.
It's time to color your running horse!
How to draw a horse's eye
403 Forbidden403 Forbidden
nginxIf you want to draw a horse's head step by step, it is important Special attention pay attention to the image of the eye. You should remember all the nuances so that your horse’s eyes are as realistic as possible, reminiscent of real ones.

Take into account all the nuances. If you don’t know exactly how to draw the details of the eye, you should just rely on the presented sample. With such eyes, the muzzle will be amazingly realistic!
How to draw a horse's mane
403 Forbidden403 Forbidden
nginxWondering how best to draw a horse's mane? It is worth paying attention to several nuances so that your horses resemble real animals in the drawings. After all, a well-drawn mane can give an image realism, dynamism, and emphasize the movement and power of a horse!

- When drawing the mane, always try to avoid tracing the outline of your horse's "hair" with a pencil. Draw curls, outline the mane with lines. Everything should be natural.
- The mane will look great if you apply more strokes with a simple pencil, shade them, and then use several lines to outline the direction of hair growth and the location of the curls.
It is with the help of the mane that you can easily emphasize the movements of your horse and make the pattern dynamic. When the horse is standing, the mane will hang freely. If a horse runs, jumps, stands on its hind legs, its mane is raised up, it is blown by the wind, it looks thicker.
Use algorithms, remember useful tips. You will draw horses with pleasure and create real pictures!
Look, how to draw a horse - video tutorial:
Artistic creativity can become your favorite hobby when you learn how to draw horses with a pencil step by step. We wish you success!
Today we will continue the series of lessons on drawing animals. We already know how to draw a wolf, a dog and a cow. Now we will teach you how to draw a horse with a pencil step by step. After all, if you think about it, in the Middle Ages it was impossible to do without these living taxis. They served as both passenger and cargo transport. What can we say about cavalry, without which not a single army in Europe could do in those days. In addition, horses are amazingly smart, both in their own right. working life, creatures. They understand their owner very sensitively and listen to him. Well, mustangs have become one of the symbols of disobedience and free character.
And so let's start drawing our horse friends!
STEP 1. The first thing you need to do to learn is to draw the basic line of the horse's body. You can achieve this by making three circles, one each for the head, chest and rear end. Then add auxiliary lines that will connect them all, starting from the neck, back, belly, tail and legs. 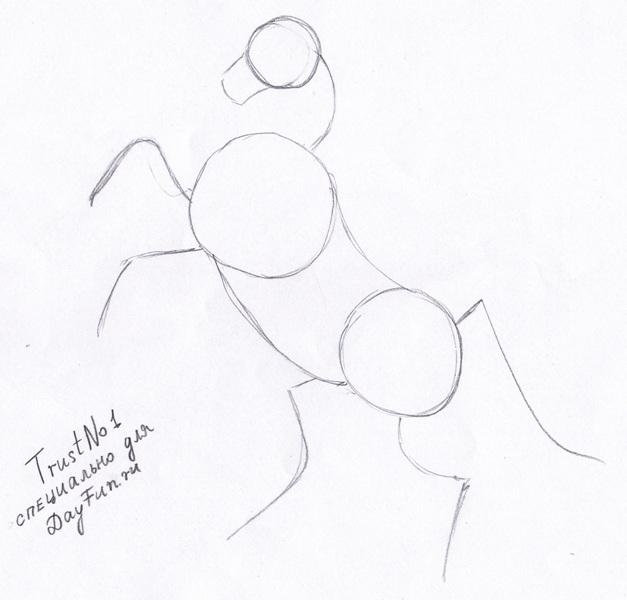 STEP 2. Now you can start sketching out the shape of the horse's head and nose as you see here. Also draw the mouth opening exactly as in the drawing, so that your stallion has a look of rage on his face. Start sketching out the neck, and muscles on the front leg or shoulder.
  STEP 3. We continue our lesson, how to draw a horse with a pencil. Let's start drawing the horse's head, adding ears and the beginning of the mane. Once this is done, you can do the back of the neck and then the curve of the back. Next we draw in more detail the eyes, nostrils and teeth. Perhaps our lesson on how to draw a mouth will help you.
  STEP 4. It's time for the real fun to begin. It's time to draw the horse's mane. Since this stallion is in an aggressive position, you will need to make his mane to make him look wild. A few sharp edges will give this effect. Next you should finish sketching out the front legs, and then the hooves. You should also draw the belly, and the beginning of the hind legs.
  STEP 5. You're almost there guys, just a few more steps to work. Start sketching out the back legs in full shape, and then add one more thing that makes him look like a stallion (gee-gee).
  STEP 6. Lastly, draw the tail of the stallion and then add some minor muscle features like in the picture. Erase the auxiliary lines and shapes you added in the first step to clean up this drawing.
  When you're done, you should have a sketch that looks just like the one you see here. All you need to do now is add color. I hope you enjoyed this tutorial that taught you, . Follow our website, here you can find interesting drawing lessons every day. Leave comments and show off your work. You can copy from the picture that I gave, or look on the Internet pencil drawings of horses and try to draw a horse yourself.
Drawing a horse's head is quite difficult, since you not only need to maintain all the proportions, but also take into account many small nuances. To get in the end good result, you need to be patient. So, to draw a horse head you will need the following items: sheet of paper, pencil and eraser.
When everything you need is at hand, you can begin to depict the horse’s head:
1. Use light lines to outline the outline of the animal’s head;

2. Draw both ears;

3. Outline the location of the mane and bangs;

4. Draw the mouth and lower jaw;

5. From below, mark the so-called ganache with an arc. It occupies approximately half of the animal's head;

6. Draw inner part ears and mark the bottom line of the horse’s neck;

7. Draw the nostril and eye of the horse;

8. Draw the mane and bangs. If desired, you can make the mane longer and thicker;

9. Shade the animal's head. Try to apply short strokes using a very sharp regular or mechanical pencil.

Horse head drawing is ready! You can draw the horse's head with colored pencils, any paints, or, for example, pastels.


