Bent-over barbell row with a reverse grip. Bent-over barbell row with a reverse grip. We study all the subtleties and secrets. Here's what it might look like in practice
The best exercise for the back is the bent-over barbell row. It is effective anytime and anywhere, is done quite simply and perfectly pumps the entire back. Like the bench press, it can be called a base.
What muscles will work?
Our back consists of the following muscles:
- The lats (or wings) are the very area between the elbow and the body that bodybuilders love to brag about. It is because of the hypertrophy of these muscles that your back will look wider and stronger. Do you remember how grandma in the yard, when she saw a beefy guy, said: “He walks like he forgot his watermelons at home”? That is why he says that his arms are protruded to the sides - his back is large.
- The rhomboid muscles are located just below the shoulder blades on either side of the spine. They provide relief to the back along with other small muscles.
- The teres major muscles are located just below the shoulder, on the upper edge of the shoulder blades. They appear in the form of an irregular circle on the athlete’s back.
- The trapezius muscles cover the central part of the back from the thoracic to the cervical region.
- Spinal erector muscle. And also biceps (if you want to pump them up, use barbell curls).
So, all these muscles work simultaneously in one exercise. Bent-over barbell rows are a basic exercise for the back. Another name is bent-over barbell row. Although you can also pull it to the chest. The deadlift is a must-do for anyone who wants to build muscle; it is a powerful, effective exercise, just like the bench press, squat, and deadlift.
The Importance of Stretching
Unfortunately, this is not a bench press where poor stretching will not ruin the technique. We'll need a good stretch. The fact is that the starting position for the exercise requires good flexibility of the lower back and back. This pull is associated with lumbar flexion. Therefore, you will need to stretch it as much as possible.
Poor stretching will prevent you from getting into the desired position, which will prevent you from doing the exercise correctly. Correct execution means smoothness, flexibility and control over every movement. Remember this.
Exercise options
Let's consider the options:
- Bent-over barbell row.
- Bent-over barbell row.
- Bent-over barbell row with a reverse grip.
- T-bar row.
The latter does not exactly apply to barbells, but it is performed in exactly the same way as the bent-over row, so we will say a few words about this exercise.
Another name for this exercise is the standing bent-over barbell row, because it cannot be performed while sitting. Although, there are special simulators in which you can lie face down and do the same movement. The load on the lower back muscles disappears completely. Rowing such a bar is a good alternative for people with bad backs, but such a machine is not available in every gym.
Barbell row to the waist
Before performing the exercise, place a barbell with a warm-up weight on the racks at a level just above your knees. Why should we once again load the lower back muscles by lifting weights from the floor - this is an unnecessary waste of energy.
- We stand in front of the barbell. We grab it with a wide grip (wider than the shoulders) and remove it from the racks. The grip is straight (fingers towards you, fists outwards). The brush does not bend, but stays straight. Elbows are placed to the sides. There is a natural arch in the lower back, the back is straight, the legs are slightly bent at the knees.
- We tilt our torso forward, trying to achieve a position close to parallel with the floor. Balance is maintained due to the fact that while bending, you bend your knees, moving your pelvis back. We fix the body in this position.
- Now we pull the barbell towards the stomach (towards the lower part), bringing the shoulder blades together as much as possible. The bar row is carried out by the muscles of the back, not the arms.
- Hold at the top point for 1 second and smoothly lower the projectile back, spreading your shoulder blades to the sides. We try not to change the position of the back. We simply lower our arms as far down as possible by spreading our shoulder blades.
We do 15 warm-up repetitions like this. Then we do 8-10 repetitions in 3-4 approaches with working weights.
When performing bent over rows, technique should come first. Compliance with the rules of performing the exercise is the prevention of injuries and ensured muscle progression.
After doing this, you should feel your back, not your biceps. The exercise gives a good increase in strength and mass.
Errors
Please note possible errors:
- You are not leaning forward enough. It happens that a person bends at an angle of more than 45 degrees to the floor. This is not harmful to the back if performed correctly, but it is not possible to pump up the entire back due to the small angle of inclination. Ideally, bent over rows are done almost parallel to the floor. But this option puts more strain on the lower back. Different parts of the back can be pumped by pulling a barbell or barbell towards the chest or lower back, but not by changing the angle, this is not the chest.
- Rowing a barbell or barbell using the biceps. To do this, there is a barbell curl. If done correctly, your back will get tired. The biceps should not be the main engine of weight.
- Round back. If you have poor stretching or a weak back (train hyperextension), you will do the exercise with a rounded back. Either one or the other will not allow you to bend over. Therefore, to do everything right, train your back with additional exercises and stretch your lower back and hamstrings.
- The hands are bent under the weight of the barbell. Your arms should be straight from elbow to fist. Try to pay attention to this.
- Heavy weight. With a lot of weight, you will not be able to pull the barbell to the desired point and bring your shoulder blades together, this has been tested. Choose the right weight.
- Light weight. In this case, you will not achieve muscle growth. But you can practice your technique, which is where we recommend starting to conquer any exercise.
- Try to spread your elbows. In this technique, the elbows pressed to the body will interfere with the exercise.
- Lifting weights using lower back strength. This is not a deadlift; in this exercise we work the entire back rather than lifting it. The extensors receive only a static load - that is, they support the back in a fixed position. If performed incorrectly, the back straightens along with the arms. Then it goes down. It turns out to be a real deadlift with elements of rowing to the belt.
- Hold your breath while performing. If the bench press is done while exhaling, that is, at this moment the bar comes from the chest, then in the deadlift at this time an inhalation is taken. Because in this exercise this is the least effort. We breathe correctly - lowered as we inhale, raised as we exhaled. And no delays.
- Attempt to deadlift in Smith. If you can do bench presses and squats there, then abdominal rows are impossible. Because the bar does not move on an axis perpendicular to the floor. Its rise is at a slightly different angle. So do it with a free barbell.
- Grasping the bar with a narrow grip rather than a wide one. You need to take it wide in order to better load the entire back.
A kind of bent-over barbell row with a reverse grip allows you to pay more attention to your back.
- We become exactly the same as in the previous case, only the grip on the bar will be different - the opposite. This way you can increase the amplitude of the execution, pumping your back even more.
- We do 8-10 repetitions in 3-4 repetitions. The mistakes to avoid are exactly the same here.
Watch your brushes, they should not be bent. This is dangerous because your hands may get injured (your wrists will start to hurt from doing this). Then you won't be able to do push-ups and bench presses or shoulder presses.
If you have a good level of training, it is better to perform just this option in order to pump up your back as effectively as possible.
Chest cravings
Bent-over barbell rows are another exercise option that aims to pump up your upper back. That is, the broadest muscles on top, trapezius and deltoids swing. It needs to be made as an addition to the basic option - to the belt. Then it will be most effective.
T-neck
“T-bar” is a kind of simulator for rowing to the waist or to the chest. Only instead of a regular bar, you hold a special bar in your hands, one side of which is attached to a stable base, and weights are hung on the other side. This is a very convenient option because it takes the load off your back and concentrates the weight in the center between your hands. This is the same bent over barbell row, only much more convenient.
(5)
Bent-over barbell rows are one of the most effective bodybuilding exercises for developing the thickness of the latissimus dorsi muscles. It can really add volume to your back, but in return it requires strict adherence to the correct technique. This exercise is basic, since the work involves a large group of muscles, but the main load falls on the latissimus dorsi muscles.
What muscles work
- latissimus muscle
- rhomboid major muscle
- teres major muscle
- teres minor
- trapezius muscle
- infraspinatus muscle
- deltoid muscle: back
- brachialis muscle
- biceps brachii
- brachioradialis muscle
- spinal stabilizer and extensor muscle group
Execution technique
- To perform deadlifts, grab the barbell with an overhand or underhand grip (read below for how to choose the right grip) shoulder-width apart. Bend your knees slightly. Tilt your body forward at an angle of 30-45°. Try to keep your back straight throughout the entire exercise, maintaining a slight arch in the lower back. Head raised, looking straight ahead. We hold the barbell with our arms down, slightly bent at the elbows. This is your starting position.
- As you exhale, pull the barbell toward your waist, bending your arms. The barbell should move in a straight line along your thighs. Feel how the latissimus dorsi muscle works. Use your forearms and biceps only to support the weight, not to pull. Don't spread your elbows out to the sides, try to keep them closer to your body. If your elbows are pulled apart, then part of the load will transfer from the latissimus muscle to the rear deltoids, which should not happen. Keep the body motionless.
- At the extreme point of the movement, when the barbell is near the stomach, the elbows are pulled back as far as possible, and the shoulder blades are completely retracted, tighten your back muscles as much as possible, pausing for a second.
- As you exhale, slowly and under control lower the barbell, returning to the starting position.
Straight grip

When performing bent-over barbell rows with an overhand grip (overhand grip with palms facing down), the muscles of the upper back (rhomboid muscles, lower and middle parts of the trapezius muscles) work primarily. The pull occurs closer to the chest and not to the belt due to the fact that the elbows look slightly to the sides, and the grip is wider.
Reverse grip

When performing bent-over barbell rows with a reverse grip (underhand grip with palms facing up), the muscles of the lower back are mainly worked, namely the latissimus muscles. Using a reverse grip, you can keep your elbows much narrower, which forces you to pull the barbell exclusively towards your belt. Therefore, the reverse grip is most effective if your goal is to develop your lats and make your back more massive.
- You can vary the depth of the body tilt, thereby changing the area of muscles that are affected by the load. The greater (deeper) the slope, the greater the load on the lower and middle back (latissimus muscles). The lower the slope, the greater the emphasis on the upper back (rhomboids and trapezius).
- Don't go for heavy weights. Remember that the main thing in this exercise is the correct technique. All risks of injury must be minimized.
- The chest is straightened. The gaze is directed straight ahead, not down. Legs slightly bent at the knees. This will allow you to keep your back straight and avoid slouching.
- Don't let the bar hang down with your arms fully extended. At the bottom of the movement, the arms should remain slightly bent at the elbows to maintain tension in the back muscles.
- To emphasize the load on the back muscles, and not on the biceps and forearms, you can use special straps for a secure grip on the bar. In addition, over time, the weights in the exercise will increase, and the use of straps will become necessary. It will get to the point where you will be pulling much more weight than you can hold in your wrists.
Good day everyone, in today's episode I will tell you about one of the most effective exercises (in my opinion) for developing the back muscles - standing bent-over barbell rows.
I will tell you about all the subtleties and secrets of this exercise from A to Z:
- what it is
- what exactly is it aimed at (muscles involved)
- What are the variations of the bent over barbell row?
- why this exercise is one of the most effective
- what are the benefits of this exercise
- how to perform it correctly (execution technique) + what special nuances (technical points that are important to pay attention to)
- I’ll also tell you about the main mistakes most people make when performing this exercise... well, etc.
Those. along the way, I will try to raise all sorts of questions regarding this exercise (and accordingly give full answers to them, without lies and falsehood). Well, let's get started.
Bent-over barbell rows are used to train the back muscles. To be more specific about the muscles involved, the rows work:
- latissimus dorsi
- back extensors
- teres major muscles
- posterior deltoid muscles
- arm flexors (biceps, brachialis, brachioradialis)
- and when bringing the shoulder blades together (i.e. with the correct technique), the rhomboid and trapezius muscles also work.
See more clearly in the photo below:

Bent-over barbell row
This exercise is great for those whose goal is the overall array of back muscles. Those. I want to say that standing bent-over barbell rows perfectly develop the latissimus, trapezius and rhomboid back muscles.
And for those who don’t know, these muscle groups are precisely responsible for the overall mass of the back..
That is why I consider this exercise one of the most effective for growing back muscle mass, and that is why I strongly recommend performing this exercise on a regular basis.

P.s. at the initial stage (when you are still a beginner), under no circumstances chase working weights!!! It is very important.
It is much more important to master the correct technique for performing the exercise before grabbing (and chasing) the weight.
In addition, when you perform the exercise, the extensors of the spine (pillars) are additionally involved in the movement, and if the weight is too heavy, you will 100% harm yourself (you will not be able to keep your back straight as it should, you will round it and 100% get injured) , and the spine is a bad joke, so think 100 times before doing anything (adding weight, showing how cool I am, showing off in front of girls, etc.)
Yes, yes, yes (for those who don’t know), in addition to the classic style of performing this exercise (classic means that you hold the barbell with an overhand grip), there are also other variations:
- Bent-over barbell row with reverse grip;
- T-bar row (standing or lying on the machine)
- Smith machine bent over row;
Now we will briefly go through these exercises (with photos and descriptions) so that you have an idea of what we are talking about.
Here is a photo (below) demonstrating the classic bent over row (as I already said, the classic means that you hold the barbell with an overhand grip, that is, from above, all this is shown in the picture below):

Classic bent over row
And here is a photo (below) demonstrating a bent-over barbell row with a reverse grip:

Bent-over barbell row with reverse grip
Here is a photo (below) demonstrating the T-bar row (in this version, the photo shows the T-bar row lying on the machine, but there are also variations of this machine only while standing):

Lying T-bar row

Standing T-bar row
There is another variation of this exercise (t-bar row) (see photo below):
Standing T-bar row
Here is a photo (below) demonstrating a bent-over barbell row on a Smith machine:

Smith machine bent over row
And finally, a photo (below) that will demonstrate the barbell row at an angle to the chest (for the development of the rear deltas), the main difference is that the barbell is not pulled to the lower abdomen, but to the chest (i.e. the rear surface is actively working here shoulder, i.e. rear delta):

Bent-over barbell row (to develop the rear delts)
Well, friends, I introduced you to the variations of the bent stay row (at least visually), now it’s time to discuss the technique of performing this exercise (the technique is essentially the same for all variations of this exercise, there will be only small changes, which I mentioned in advance I warn you:
- when you do a classic deadlift, your grip is from above (i.e. it’s straight)
- when you do not a classic deadlift (not with a direct overhand grip), but with a reverse grip = i.e. you see, the grips change.. there it’s straight from above, and here it’s from below (reverse).
In the bent-over barbell row, the change is that you do not pull to the lower abdomen (as usual in other rows), but closer to the chest (in order to emphasize the load on the rear deltoid), that’s basically all...
There are no changes in other variations. This means that the basic technique for performing the movement will be the same (be sure to read below).
Technique for performing the exercise: standing bent-over barbell row
Firstly, before you do anything, it is vitally important to take the correct position in this exercise, because in this position you will be constantly (performing repetitions) but not only (if your position is incorrect, you will most likely get injured, get serious back injury, this is in the worst case, in the best case you will contract your back muscles poorly, therefore, in both cases you will not get results). Tax, okay, what kind of situation is this?
Position: Bend your knees and move your torso forward, keeping your back straight (it is very important that your back is not rounded, but straight, arched in the lower back), see the photo (concerning the arching of the back, the figure shows how it is correct and incorrect):

Correct and incorrect back position
P.s. above in the figure (where in green, the position of the back is simply shown, i.e. it is flat, arched in the lower back, this is how your back should be throughout the entire exercise, but the position itself there is not correct, this is the position of the deadlift, and we are doing bent over row).
And in the bent over row the following position (you are bent forward, i.e. your torso is tilted forward, your legs are slightly bent at the knees, your back is arched in the lower back, no rounding, otherwise there is a high probability of back injury)<= так вот такое положение должно быть почти параллельно полу.
Those. (now we are talking about the angle of inclination), see the photos below (I’ll try to explain):

Angle of inclination (torso) parallel to the floor
Do you see? See how Ronnie Coleman is slanted?
His torso (leaning forward) is almost parallel to the floor. This is ideal...
I used to do this exercise in the same way, but now when you work with a lot of weight (parallel to the floor it turns out too hard), you have to do the slope not so deep, a little higher (literally a little, as shown in this photo below):

The tilt of the body (torso) forward is not so great, well above the parallel of the floor (<= рекомендую работать в таком наклоне)
- In this position, direct your gaze forward (this is very important, under no circumstances lower your head down, look strictly forward in front of you in the mirror (if there is one)).
- In this case, your hands should hang over the apparatus (with an overhand or underhand grip, depending on which variation of the pull you have chosen) and be perpendicular to the floor and torso.
- Grip the barbell (when deadlifting) a little wider than your shoulders (where the scars are, a little wider; if you grab closer, you won’t be comfortable working, you’ll hit your own knees, so grab a little wider than your foot position).
All this is your starting position (position).
P.s. a few words about grip width.
The trick is that you can take it too narrowly or too broadly (essentially).
What changes will there be? Remember:
- the narrower you grab the bar = the more the biceps will work (rather than the back), but with a narrow grip, the amplitude of movement increases (this is good).
- the wider you grip the bar = the more your back will work, but with a wide grip, the amplitude of movement decreases (this is bad).
This is precisely why you need to look for the golden mean (which is a little wider than shoulder width or shoulder width apart).
What's next?
Well, ok, you grabbed the bar (with a grip shoulder-width apart or a little wider, for convenience, so that you feel comfortable doing the exercise), leaned forward (leaned your torso, making the necessary comfortable bend, as shown in the picture above), if you did all this , you are in this position (see photo below):

Bent-over barbell row (lowest point)
Please note (the bar is located just below your knees).
So, from this position (it is constant, i.e. the torso remains motionless during the exercise), you need to pull the barbell towards you (pull it to the lower abdomen).
At the same time (when you pull), keep your elbows close to the body (and not to the side, as some people mistakenly do), when you have pulled the barbell to the lower abdomen (well, you are already in the upper position), squeeze your back muscles (bring your shoulder blades together) , it is very important!!!

Bent-over barbell row (top point)
That’s actually all... this is how we perform the exercise (here here there here), i.e. pulled to the lower abdomen, lowered down (just below the knees) and again pulled to the lower abdomen and lowered again, etc. until you complete the planned number of repetitions.
This whole movement clearly looks like this: (gif. Picture)
For men:

Bent-over barbell row (full motion)
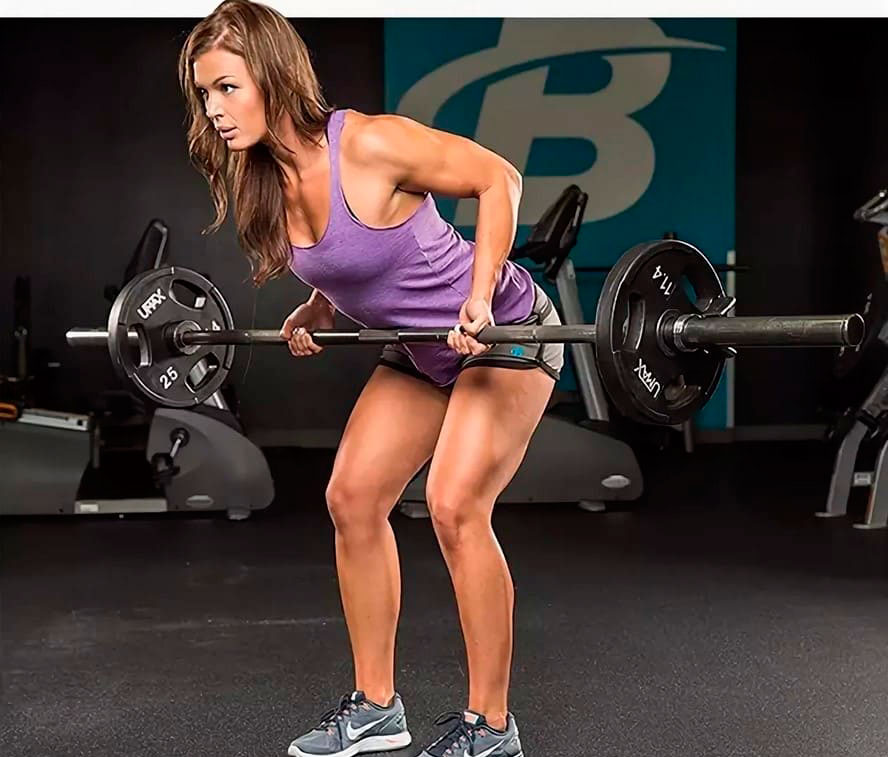
Among women:

Bent-over barbell row (full movement) for girls
Key technical points that you should pay special attention to:
1. Throughout the entire movement, keep your back straight (arched in the lower back), almost parallel to the floor (as Ronnie Coleman did, I showed the photo) or if you are already working with weights (then slightly above parallel, so as not to ruin your lower back).
2. Don’t forget that your knees are slightly bent (they are not straight; with straight legs, your back will round, and this is unacceptable).

3. While performing the exercise (bent over row), look straight ahead (in front of you), if you look down, your back will immediately round and you can get injured (in the worst case), in the best case (you’ll be lucky, you won’t get injured, but the back muscles will not receive the proper load, as they could with a proper back).
4. At the top point (when you pulled the weight to your stomach), squeeze your shoulder blades (required) so that your back muscles engage.
5. When you pull the barbell (to the top point) i.e. to the lower abdomen, try, firstly, to pull the bar (barbell) along your legs to the lower abdomen and at the same time (secondly), try to keep your elbows closer to the body, i.e. do not move them to the side, closer to the body.
6. When you already use decent weights, I recommend using straps (in order to hold this same weight), the trick is that our cysts are much weaker than the back or biceps, therefore, why not help them? Use it! See below (how to wrap the straps around the bar):

Instructions on how to wrap straps around a barbell
7. Breathing as always (i.e. exhale with effort).
8. Work without stopping (some recommend pausing at the top and bottom points in order to stretch and contract the muscles, in principle you can try, feel how it will be more comfortable for you, how the muscles contract, etc.), but for me it’s more convenient work without pause.
9. At the lowest point of the range of motion (when you are leaning closer to the horizontal, or standing somewhere at 30 degrees, in general, you are in the starting position and preparing to pull the bar to your lower abdomen) make sure that your arms do not straighten at the lowest point to end!!

This is very important, i.e. The arms are slightly bent at the elbows, your arms should not be stupidly straight (otherwise the weight will hang on your arms), therefore, the elbows are slightly bent so that the load remains in the muscles.
10. There is an opinion that the classic bent-over barbell row is a little worse (or even much worse) than the reverse-grip bent-over barbell row. I think this opinion is not entirely correct... now I will explain everything.
The fact is that a direct grip forces the athlete to spread his elbows wide and pull the barbell to the chest, and not to the lower abdomen (as needed). Yes Yes Yes<= я очень часто вижу такую ошибку у большинства людей (даже более продвинутых).

Actually, because of this, the latissimus muscles practically do not work (or do not receive the additional load that they could receive), but with a reverse grip = it is more convenient for you to do the exercise, you simply aim there (as in a Smith machine) pull towards lower abdomen.. (p.s. I don’t know how to explain).
But, friends, in my opinion, this opinion is partially correct... because those people (athletes) who perform the exercise correctly (with the correct technique, i.e. pull to the lower abdomen, and not to the chest + bring their shoulder blades together) have very The latissimus dorsi muscles work well, but those people (who do it with the wrong technique, i.e. they pull closer to the chest and load the deltoids) their back does not work.. Well, who is their doctor? .. It's their fault, not the exercises. Learn to perform the exercise correctly before drawing any conclusions.

11. In connection with the paragraph just above (about the classic and reverse grip), you can try to combine both grips (in order to understand what is more comfortable for you and better in terms of the feeling of contraction), for example, do 2 approaches with a classic grip (regular , i.e. direct), and the next 2 approaches in reverse. This is just an example.
12. Until you master the correct technique for performing this exercise and develop the overall muscular framework of your back (strengthen your back extensors), don’t even touch heavy weights.


The main mistakes people make in this exercise
Firstly, this is, of course, rounding the back<= этого делать нельзя, не забывайте о том, что спина должна быть ровной (прогнутой в пояснице).
Secondly, many people, at the top point (when they pull the barbell to the lower abdomen) straighten their torso too much upward, cannot restrain the same forward bend as it was (because the weight is too heavy), you cannot do this throughout the entire movement, your body (posture, torso, core) must be fixed.
Those. keep your back straight and your body parallel or slightly at an angle to the floor and do not allow your body to “go back and forth”, so to speak, thereby cheating at the expense of your hips and knees.

Thirdly, people very often complain that their biceps get tired, and all because they perform deadlifts solely using the strength of their arms, namely their biceps (so they get clogged, but their back doesn’t works, or does not receive enough load, in any case this is bad, try (learn) to feel the latissimus dorsi muscles, not the biceps).
Fourthly, as I already said, many people pull from the lower to the upper position not to the lower abdomen (as if along the legs), but to the chest.. This is not correct, if your goal is to train the back muscles, you need to pull the bar along your legs to the bottom of the belly!!!
For dessert - a video (for men/women separately), from which you may highlight something else for yourself:
In the halls where there were no fashionable Hummers and various blocky cars for all occasions, there were still strong guys with wide triangular backs. How did they do it? That's right, pull up with weights and perform bent-over barbell rows. By the way, for a natural athlete these two movements can be the main ones for many years. And if you are not a bodybuilder, but just want to become strong and healthy, this workout will give you everything you need. Bent-over barbell rows are part of the plans of ordinary athletes and powerlifting enthusiasts. This is a basic exercise that targets all the back muscles and allows you to develop strength.

- Latissimus dorsi muscles. These are our “wings”, large paired muscles, the development of which shapes the width of the back and its appearance. The lats start in motion and bring the barbell to the lower abdomen through contraction. Some trainers are sure that the bent-over barbell row is an exercise exclusively for the lats, and only then for the rest of the back;
- Diamond-shaped. Small muscles in the area of the shoulder blades work as a tool to tighten the shoulder blades. They bring the weight, but also help to start movement when bringing the shoulder blades to the spine;
- Trapezoidal. They must stabilize the shoulder in this movement. But some athletes “pull” the barbell due to a specific movement that resembles a shrug with a barbell; it turns out that they work more with the trapezius than with the lats;
- Round. Muscles that seem to connect the back and chest. They work when we inflate and, as it were, push the chest forward;
- "Pillars" or spinal extensors. They allow us to maintain a static tilt.

The exercise places specific demands on form. Do you know why most men cannot bend forward normally? The reason here is not pain in the lower back, or even stiff hamstrings. The body position is usually stabilized by inflexible ankles. You will have to start the workout by stretching in a split squat with the heel of the back leg lowered to the floor. It is enough to stretch for 30-40 seconds on each side to make the bend more free.
Exercise options
In this article we will not talk about rows while lying down, since they are slightly different in biomechanics and take the load off the rectus dorsi muscle.
Bent-over waist rows come in the following variants:
- Classic bent over row;
- Bent over chest row;
- T-traction;
- Reverse Grip Abdominal Row
Typically, this row is distinguished from rows with dumbbells and barbells lying face down. These rows are performed to relieve stress on the long back muscle and lower back. They are also suitable for studying the “shoulder blade contraction”.
Execution technique

- Typically, bodybuilders use racks in this exercise, put weight on them, take the barbell with a straight grip wider than shoulder width, straighten up, and remove it from the racks
- perform a forward bend due to flexion in the hip (mainly) and knee (additionally) joint.
- Bending should be symmetrical on the right and left.
- Then, by adducting the shoulder blades and contracting the lats, the barbell is raised to the stomach and lowered smoothly.
Many people prefer to take the first repetition of this exercise from the floor using the deadlift technique. This makes sense as it helps to better engage the long back muscles and immediately place the shoulders in a neutral position. But other athletes believe that this way the athlete only loses strength in non-target movements. In practice, it is worth using both options and choosing the one that seems more convenient and accessible.
Important: this movement is technically difficult, especially for those who have never worked their back before. It’s better to take a smaller barbell and master contracting your lats on it than to hang a “serious weight” and lift it with your biceps and by cheating.

The technical errors in this version of the movement apply to all bent over rows. People tend to push the weight too hard with non-target muscles, and perform a lot of unnecessary movements that do not help pump up their back in any way:
- Shallow slope. This leads to the fact that the lower muscles that run along the spine are overloaded, and a significant part of the weight falls on the lower back. If there is a curvature, and the athlete works with cheating, swinging his body, it turns out that he is constantly trying to displace the vertebrae in the lumbar region. This usually ends in pinched nerves and pain;
- Break and reach with biceps. The athlete bends over, and everything seems to be in order, the barbell rises to the stomach or to the chest, but in reality, the athlete performs a kind of hybrid of biceps curls and “lifting” the back. It is clear that this way the load leaves the target muscle group and shifts to the arms. Usually all this also leads to a sprain of the elbow ligaments, since the athlete seems to “drop” the barbell from above;
- Rounded lumbar spine. Some trainers mistakenly believe that the main “evil” is the round chest. If an athlete has a curvature of the spine, it will remain slightly rounded, this is inevitable. But in fact, the more traumatic situation is when the “hump” in the lumbar region prevents you from performing the deadlift correctly. The reason for this may be either a simple lack of concentration on the training movement or insufficient flexibility of the hamstrings. The trend of recent years is to warm up the hamstrings on a foam roller. And they're not all that useless when it comes to eliminating "humps" in your deadlifts;
- Wrist flexion. Here the athlete performs additional work on the forearm, which only causes him discomfort and distracts him from the target pull. The wrists should be straight. If the grip in the exercises is the athlete’s weak point, he should use straps;
- Inadequate weight. A huge barbell only looks cool, but in reality a beginner will not be able to perform the movement with it technically. It is necessary to choose a weight at which tightening the shoulder blades to the spine and contracting the latissimus dorsi muscles is technically possible;
- Pressing your elbows to your body and stomach. So they will interfere with making a purely anatomical movement;
- Acceleration of weight from the lower back. We are talking about a movement when the athlete straightens slightly and then, as it were, throws the bar down. This helps push the weight through inertial force to the middle of the amplitude. And above, the athlete perfectly reaches it with his biceps. It is clear that such exercises do not correspond to the purpose of the training, and jerks with the lower back should not be performed;
- Holding your breath. This is a typical beginner mistake. They usually do not breathe at all during strength exercises, occasionally taking ragged inhalations and exhalations. This leads to problems with both movement and recovery after training;
- Smith machine rows. This talented interpretation of the movement does not allow the shoulders to work in their natural amplitude. As a result, a person can injure them. Although bodybuilding stars regularly show this particular option, and praise it as a version for “muscle variety and surprise”;
- Grip too narrow. It anatomically does not allow you to engage the latissimus muscles and load your back. With a too wide grip, the athlete pumps the rear deltoids, and with a narrow grip, the biceps
This movement increases the path of the bar, that is, makes the amplitude deeper. It contributes to greater back development, but only for those athletes who turn it on at the start. The technique differs only in that the barbell is taken with a reverse grip (like a biceps grip) slightly wider than shoulder-width apart. By tightening the back, the athlete begins to move and perform deadlifts.

This variation is intended for more experienced athletes. It allows you to use both the lats and the “pillars”. It is distinguished by a deeper slope, the spine is parallel to the floor. The pull is carried out to the chest and through the back. It allows you to additionally load the trapezius and rear deltas. But this version of the exercise is contraindicated if there are lower back injuries, the athlete experiences discomfort in the thigh muscles when bending, or physically cannot reach the projectile to the chest due to weak opening of the shoulder joint.

This exercise can be performed either in a special simulator, where the bar is fixed and you can sit comfortably in a rack, or with a regular barbell. The bar is loaded into a corner and pulled towards the chest in an inclined position. Usually this version is considered the best for diamond-shaped, and for changing the load vector.
All versions of standing bent-over rows are performed 15 times during warm-up, and in working approaches - 8-12 repetitions. When working on strength, you can also use low-repetition modes.
The bent over row option depends on the anatomical features and comfort of the athlete. Beginners start with a regular bent over and forward grip, and then use a reverse grip and deeper bent overs. In any case, pumping will seriously depend on the progression of strength indicators. If you're not going to add weight to the bar, don't expect much results in the gym.
In training, this exercise is sometimes replaced with dumbbell rows. This is relevant for problems with shoulder joints and the need to add variety to the plan.
Hello, my dear kachatas and fitons! It's been a while since we were engaged in decent robbery were technical and did not consider the practical side of performing various exercises. Today we will correct this matter and pay close attention to the development of the back muscles. A basic movement will help us cope with the task - bent over barbell row. After reading, we will learn how to build a beautiful and massive back.
So, I ask you to put aside all extraneous matters and give yourself a few minutes of precious time to your loved one.
Bent-over barbell row. What, why and why?
Believe it or not, the bent-over row is one of the top three most effective exercises for developing back muscles. However, despite such a high status, it is still bypassed by many people who visit the gym (especially beginners). The main reason for this state of affairs seems to me to be the reluctance of personal trainers and gym supervisors to listen to the questions of beginners. Most often, the process is put on stream and the next newcomer is considered only as an influx of new investments. It is not explained to beginners what the best exercises are (at least at first) are exercises with free weights - barbells, dumbbells and kettlebells. They stick to the machines and perform the most understandable and simple (in terms of mechanics) movements.
Note:
2/3 The human muscle mass consists of the legs and back. Therefore, if you want to become big, pay special attention to them and spend a correspondingly larger amount of time working on them.
When the question concerns the development of such a muscle group as the back, the first thing young people begin to get acquainted with is various block exercise machines. Such designs also have a place, but still they should not form the basis of training, and often the opposite happens - what is simpler and at hand is what is used. Well, okay, this was a small introduction for general understanding, now let's get to the point.
Bent-over barbell rows are the core of bodybuilding for developing a massive back. Several joints take part in the work: shoulder, elbow and scapula. The muscle atlas looks like this:

As for the kinesiology of traction, the movement consists of controlled contraction of the shoulder blades. Moreover, complete retraction of the shoulder blades must occur, otherwise the amplitude is reduced and the effectiveness of the exercise decreases significantly. While performing bent-over rows, the torso and legs are motionless. The muscles that do this contract without shortening (isometrically).
Note:
All further narration will be divided into subchapters for better assimilation of the material.
Advantages
This is a favorite exercise of many professional bodybuilders because it provides:
No. 1. Increased muscle strength and size
Bent over rows are somewhat reminiscent of kayaking, and rowers are known to have some of the most impressive backs. The latissimus dorsi takes on most of the load; the trapezius and rhomboid muscles are also well worked. These muscle groups are responsible for the overall mass of the back.
No. 2. Improved flexibility
Deadlifting will make you more flexible by stretching your hamstrings while keeping your core as straight as possible.
No. 3. Good posture
Rows strengthen the lumbar region and the entire muscular corset of the back. They teach harmonious contraction of large and small muscle groups “tied” to the spinal column. As a result, their strength is equalized and the result is a healthy back with a proud posture.
No. 4. Increasing pure power and strength in basic exercises
A practical and scientifically proven fact - bent over rows contribute to progress in exercises such as and.
No. 5. Increased calorie burning
The exercise belongs to the category of “weight loss”, because... a large cumulative force of several muscle groups is generated, and this helps to increase the metabolic rate. When the number of calories burned is greater than the number consumed, excess weight goes away.
Strength exercises have the best effect on improving body composition - fat mass is lost and muscle mass increases. All this ultimately leads to the creation of more appetizing forms.
So now let's move on to...
Execution technique
At first glance, it may seem that the exercise is “easy” :), but this is not so - there are various subtleties and nuances of implementation, which we will discuss below. Step by step, the technique consists of the following steps.
Step #1.
Load a barbell with weight and place it on the floor. Bend your knees and lean your torso forward, keeping your back straight. and almost parallel to the floor. Direct your gaze forward. Your arms should hang over the apparatus and be perpendicular to the floor and torso. The grip is slightly wider than shoulder width. This is the starting position.
Step #2.
Keeping your torso still, exhale and pull the barbell towards you. (towards the middle of the abdomen). Keep your elbows close to your body and use only the strength of your forearms to support the weight. In the top position, squeeze your back muscles, keeping the peak contraction at 1-2 seconds.
Step #3.
Inhale and slowly lower the barbell under control to the starting position. Repeat the procedure for the specified number of repetitions.
In the picture version, all this disgrace looks like this:

In motion, the process looks like this...
Main technical points that you need to pay special attention to:
- Until you master the technique and develop the general muscular frame of your back, you should not move on to heavy weights;
- do not allow the body to move;
- throughout the entire movement, keep your back flat, almost parallel to the floor;
- do not rush and do not jerk the weight;
- do not pull the barbell too high (to your chest) or too low;
- use a weightlifting belt for better back stabilization and when working with heavy weights;
- as soon as you lower your gaze to your feet, your back will immediately round.
- if you have problems with flexibility, then perform the exercise while keeping your buttocks pressed against a vertical support (wall);
- For significant weights, use special straps and gymnastic belts.
Now let's look at the main mistakes that occur when performing the exercise. These include: 1) rounding the back; 2) straightening the body; 3) bending the wrists 4) pulling weights solely due to arm strength:

As for the variations of the bent-over barbell row, they are as follows:
- reverse grip row;
- thrust in;
- barbell row to chest (rear delts).

The classic option for performing barbell rows is straight-grip rows. The reverse grip is most often not used due to unfamiliarity. However, it is in this grip that the secret of a huge back lies, which not many people know. The thing is that an overhand grip forces the athlete to spread his elbows wide and pull the barbell towards his chest. In this regard, the latissimus muscles practically do not work. To put the “wings” into work, you need to use a reverse grip (biceps). It is he who forces you to pull the barbell towards your belt and specifically loads the lats. Ideally, when training your back, it is better to combine both options, for example, starting with a straight grip and heavier weight ( 2 approach), and finish with a reverse grip with a reduced load ( 1 an approach) .
It is also worth noting that the exercise is not only pivotal for the development of back muscles in men, ladies should also include it in their routine. By the way, you can even practice it at home, using a mop instead of a barbell. (with some weight around the edges) or a backpack (with books).

Well, in conclusion I would like to examine 5 practical tips to learn when working with this pulling exercise.
Note:
Professional athlete coach Glenn Pendlay from MS USAW (USA) conducted a study of the EMG activity of various variations of bent-over barbell rows. He discovered that the classic bent-over row with return (in each repetition) the projectile on the floor allows you to strengthen the muscular corset of the back much better than any other variation.
Subtleties and secrets
No. 1. Return the barbell to the floor with each rep.
When the bar hangs in the air during a classic exercise, the upper back does not receive enough load. To work the entire muscle layer, return the barbell to the floor with each repetition.
No. 2. Bench press simulation
The bent over row motion should resemble the reverse bench press.
No. 3. Elbow movement
To keep the exercise from turning into a bicep curl, keep your elbows pointed toward the ceiling instead of just pulling the weight with your arms.
No. 4. Correct body position
Keep your back straight and your body parallel or slightly at an angle to the floor. Do not allow your body to “walk” using your hips and knees.
No. 5. Head position
You should not look in the mirror in front of you, in which case your neck may hurt from tension. Don't look at your feet, this will round your back. Just direct your gaze slightly forward.
Well, that’s probably all, remember all the calculations outlined, and you will become the owner or owner of the most beautiful back in the room!
Actually, all we have to do is take stock and say goodbye.
Afterword
Today we learned to swing our backs, and the bent-over barbell row exercise helped us with this. Now you know how to properly load your back, all that remains is to put the theory into practice. Well, you can handle this just fine without me, so let’s blow into the hall, go ahead!
Finita la comedy, see you again!
PS. Every comment is +1 to the shape of your back, so let’s unsubscribe!
P.P.S. Did the project help? Then leave a link to it in your social network status - plus 100 points for karma, guaranteed :).
With respect and gratitude, Dmitry Protasov.


