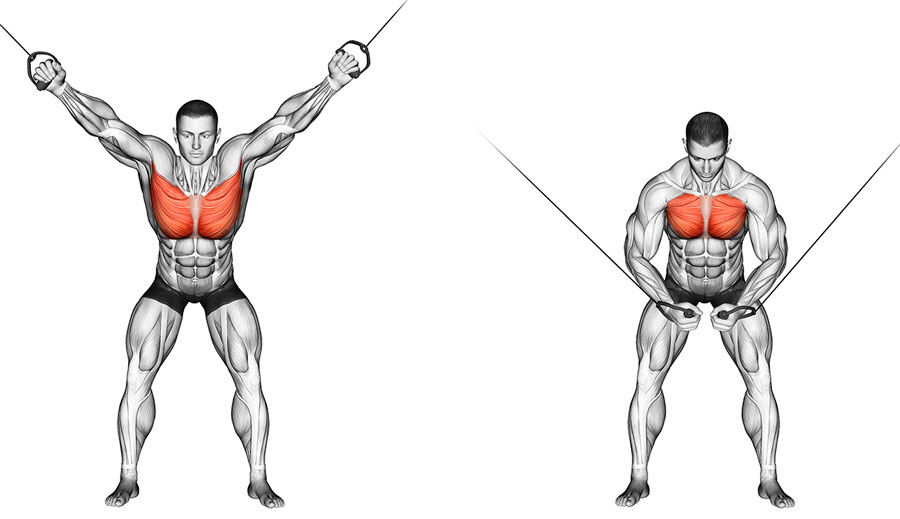
Bringing hands together on crossover blocks. Reduction of arms - crossover exercises on upper blocks: variations for the top and middle of the chest. Upper chest workout


Friends, hello everyone. In today’s article, I will tell you from A to Z about the crossover exercise (or as it is also called “Break the arms on block simulators.”
What is it, what exactly is it aimed at (the muscles involved), what are the OPTIONS (variations) for performing this exercise, what are the special subtleties and secrets when performing this exercise, and in general I will tell you how to perform it correctly (technique of execution) + what special nuances (technical points that are important to pay attention to), I’ll also tell you about the PROS (advantages) and MINUSES (disadvantages) of this exercise, at the end we’ll talk about the main mistakes most people make when performing this exercise.. well, etc. those. along the way, I will try to raise all sorts of questions regarding this exercise (and accordingly give full answers to them, without lies and falsehood). Well, let's get started.
I’ll demonstrate right away this exercise in reality (so that you understand what we are talking about):

Exercise: crossover (bringing hands together on a block)
Crossover is an ISOLATING EXERCISE (i.e., not basic, please note this), this exercise does not grow the muscle mass of the pectoral muscles, on the contrary, it shapes them (i.e., it is a formative exercise for the chest), this means that IF YOUR GOAL IS MASS (increasing the size of the pectoral muscles), then this exercise will not suit you, in this case, you need to perform BASIC EXERCISES (in our case, these are “INCENT BAR PRESS”, “INCENT DUMBELL PRESS” BENCH”, “BELL PRESS ON A HORIZONTAL BENCH” (this is exactly what they are designed for, i.e. for hypertrophy (muscle growth)), but when you have already gained meat (sufficient amount muscle mass) on the chest muscles, you can think about giving this meat (on the chest muscles) some kind of shape (look), well, you understand, this is a formative exercise, in terms of increasing muscle volume it does not give anything.
Crossover on a block, as you understand, IS PERFORMED IN A BLOCK TRAINER (special), which is only available in gyms(fitness clubs), i.e. perform this exercise at home, you don’t have such an opportunity, as you understand, and only a major who has a huge apartment area can buy this exercise machine specifically for his home, and anyway, why do it, who the hell knows... something me it went to the wrong place.. In short, the exercise machine looks like two vertical posts that are connected at the top by a frame; on these vertical posts there are adjustable weights (tiles) moving on cables. At the other ends of the cables (at the top) there are handles, which athletes pick up to perform crossovers. This is what the device looks like:

The simulator in which the crossover exercise is performed
P.s. Cable crossovers can be used as an alternative to lying dumbbell flyes.<= переходите по ссылке (почитайте про это упражнение), т.е. это я к тому, что многие люди задаются вопросом, а чем заменить КРОССОВЕРЫ НА БЛОКЕ или наоборот НА ЧТО ЗАМЕНИТЬ РАЗВОДКУ С ГАНТЕЛЯМИ ЛЕЖА?… Чаще всего таки люди не обладают достаточным кол-вом мяса (мышечной массы) на грудных мышцах, они либо новички либо среднего уровня подготовленности, а уже задрачивают эти кроссоверы и т.д. ищут ответы на что бы их заменить и т.д. это идиотизм, как по мне (я уже рассказывал выше, это упражнение не подходит для набора, оно формирующее), а те люди, которые уже набрали приличное кол-во мяса и САМИ ЗНАЮТ, что и как им выполнять, на что заменить это упражнение и т.д. надеюсь, вы меня поняли.

 As for the muscles involved in this exercise, as you probably already understand (you guessed it), ONLY THE SHOULDER JOINT WORKS (i.e., the pectoral muscles), THE ELBOW JOINT DOES NOT WORK IN THIS MOVEMENT (the triceps does not work), what does this give us? => We have the opportunity to completely focus on working the pectoral muscles (and purposefully use them).
P.s. if you have already increased meat on your pecs, and want to try something new in your training or give your pecs a shape (look), then in principle you can add this exercise to your complex, however, remember: this exercise is performed at the end of the workout, AGAIN THE SAME AFTER BASIC EXERCISES (BASIC) such as incline press barbells and incline press of dumbbells.., you can read the main article where I give recommendations regarding TRAINING THE CHEST MUSCLES => “How to pump up the chest muscles?”<= переходите по ссылке (рекомендую), там я подробно рассказываю и показываю и даже есть примеры тренировочных программ мышц груди. В общем, если и выполняем данное упражнение, то только в конце после основных базовых движений, ни в коем случае не ставим его в начало комплекса (многие умники на своих гавноресурсах рекомендуют делать в начале тренировки, не слушайте эту чушь).
Crossover options
This exercise has a lot of variations... let's do a full classification.
Firstly, the exercise can be performed depending on how high or low you lower the side handles (with which you perform the movement), i.e. YOU CAN DO CLASSIC HANDS (from the top, when the handles are placed at the top), YOU CAN DO FROM BOTTOM (when the handles are placed at the bottom), also (very rarely, but in some gyms) there is an OPPORTUNITY TO POSITION THE HANDLE ALSO IN THE MIDDLE (horizontally), depending on which option you choose, the load will be placed on different parts of your CHEST MUSCLES. Here, see the photos below demonstrating the implementation of the crossover on the upper and lower blocks:

Crossover from the upper block and crossover from the lower block
At the initial stage, I recommend that you move your hands from the top (this is when the handles are placed at the top), then when you get tired, you can try another option (well, for example, from the lower blocks), professionals decide for themselves what and how to do.
Secondly, the exercise can be performed depending on where you bring your arms and how you stand (in the starting position). Those. YOU CAN STAND IN THE STARTING POSITION IN DIFFERENT WAYS (some people stand almost vertically, some make a slight bend forward, some even stand almost cancerously). Do you understand? Here's a photo showing how you can stand while doing the crossover exercise:

Bend the body forward in the crossover exercise
You can bring your hands together in DIFFERENT WAYS, some bring them CLOSER TO THEMSELVES DOWN (in order to emphasize the bottom of the chest) (photo above No. 1), some bring them FORWARD (with a slight tilt of the body) (photo above No. 2), some - then he brings the body very much down (as if becoming cancerous) and makes the wiring (photo below No. 3). All of this (small changes) shifts the load on different parts of the chest muscles, at the initial stage, I recommend doing it either slightly bending forward or even standing in a crooked position and bringing your arms forward, it’s important to feel it, do it, learn it, then you yourself can choose a comfortable one and make the most of it. effective starting position for yourself.
Thirdly, the exercise can be performed WITH ONE HAND, OR WITH BOTH HAND AT A TIME.

Exercise: crossover (can be performed with one or two hands).
In my opinion, this is some kind of pun (for such an exercise), there is no point in working with one hand (someone argues that I feel better this way, the amplitude is greater, etc.), in my opinion this is nonsense, this is an isolating exercise which is performed at the end of the workout in order to maximally load (finish off) tired pectorals, no more. There is no universal advice, but at the initial stage I recommend performing this exercise with both hands (at once) as expected, in the future you can try it as you wish, professionals decide for themselves what and how to do it.
Fourthly, the exercise can be performed either STANDING or SITTING, or LYING (lying on a horizontal or inclined bench), or while kneeling..
Well, you’ve already seen a standing crossover a hundred times, but you’ve never seen it sitting or lying down, so see below for a photo of performing a sitting/lying crossover on the horizon. inclined benches:

Exercise: Seated Crossover

Exercise: crossover on a horizontal bench

Exercise: Incline Crossover
In general, darkness is darkness. All this allows you to work the chest muscles from different angles and intensify your approaches. There is no universal advice, I do not recommend splitting hairs; at the initial stage, do it standing (as you should), and then you can try different variations, and the professionals themselves decide what and how to do.
Crossover technique
This exercise is very complex in terms of technique; only at first glance it may seem that everything is quite easy and simple, however, this is not so, I assure you. So, let's begin.
Go to a special simulator (the one I showed you above), and on each side of the double block (left and right sides), set the optimal weight of the weight (to begin with, put a small one, 10-15 kilograms will be quite enough, then, when you have learned everything 100% technique, you can add weight if necessary). After you have set the required weight (on BOTH SIDES), attach the HANDLES to the hook (up), again on BOTH SIDES. See below what the handles for performing crossovers look like:

Crossover handles
Once you have done all this, we begin the exercise. It is very important at the very beginning of your journey to learn to GRAB THE HANDLES AND STAND IN THE CENTER OF THE CONSTRUCTION CORRECTLY. To do this, you need to first approach one side (I usually approach the left side first, i.e. I grab the handle with my left hand and pull towards myself, and at the same time I help with my right hand (hold) and move to the right side, grasping with my right hand by the right handle, after which I go to the center and slightly forward (so that I would be in the center of the machine and so that my pecs would be slightly stretched), while it is important that your body is symmetrical (that is, very often many people recommend put one leg forward and the other back so that the balance is maintained), I do not recommend doing this because the balance is disrupted (the level of strength on the left and right sides changes), so I recommend that you make sure that your body is completely symmetrical ( i.e. SHOULDERS, PELVIS and FEET), only in this case you will be able to create an optimally symmetrical load IN THE LEFT AND RIGHT SIDE OF THE PHORACT MUSCLES. This is what your position will look like in terms of symmetry and vice versa when you put your leg forward:

Starting position in the crossover exercise CORRECT and NOT CORRECT
However, many people IN PRINCIPLE CANNOT perform this exercise symmetrically (i.e. they take on a decent weight, and their balance is disturbed and they are pulled back), they cannot stand still normally, and have to put one leg forward, in such a way In this case, I would recommend that for the 1st approach, let’s put out your left LEG, and for the 2nd approach, your RIGHT LEG (this way you will create a balance for yourself so that both sides of the chest are worked out with equal force). Therefore, do not be discouraged, there is always a way out J
THE PHOTO ABOVE (demonstrates) the correct and not quite correct execution of the exercise, THIS IS YOUR STARTING POSITION (however, there is an error there, the hands are already brought down, but should be on top, if this is the starting position, I just couldn’t find a normal photo to show you this), here is the starting position of the hands:

starting position of the hands in the crossover exercise
But I found a normal photo (see below):

starting position of the whole body in the crossover exercise
I repeat (in short), grasp the handles in the correct way, go to the center of the machine, take a step forward (+ - in order to stretch the pectoral muscles), while the body is ideally symmetrical (i.e. deltoids, pelvis and feet are symmetrical), well, if you can’t, then one leg forward, the other behind (but in this case, 1 approach is with the left leg, the other approach is with the right leg, i.e. change legs so that there is a balance of strength on both sides of the chest), the back is straight and the body is tilted forward (not deeply down, as if doggy style, although it is also possible, slightly tilted down, as shown in the photo above).<= если вы все сделали правильно, то рукояти с тросом разведены по бокам до легкого чувства растяжения грудных мышц, а локти чуть подсогнуты и находятся позади Вас. ЭТО ИСХОДНОЕ ПОЛОЖЕНИЕ.
Next, we begin to move our hands at the lowest point, for this we bring the handles of the crossover in a wide arc to the center of the body, as soon as the hands reach the center, stay in this state for 2-3 seconds (contract the chest muscles, feel them), then slowly under control return along the same arc to the starting position until there is a slight stretch in the chest muscles. That's all. This is what the bottom position looks like, i.e. when you bring your hands down:

Bottom position in crossover exercise
Make sure that the movement occurs only in the shoulder joint; the arms and torso should remain motionless. After all this, repeat the planned number of repetitions and approaches. Regarding the number of repetitions and approaches, as always, everything is individual, usually I always recommend 3-4 approaches of 6-12 repetitions. Why I always recommend this way, you can read in the main articles (learn about all this in more detail), here they are => “How many approaches to do the exercises” and “How many repetitions to do per approach?” BUT IN THIS EXERCISE SPECIFICALLY I RECOMMEND a little more repetitions, 12-15.
Mistakes people make when performing this exercise
Do not round your back when performing this exercise. See the photo below (it shouldn’t be like this), on the contrary, the back should be straight:

Don't round your back when performing a crossover
Do not press your elbows to your body while performing this exercise. See the photo below (this is not correct):

Do not press your elbows to your body when performing a crossover
Avoid bending your elbows too much:

bending your elbows too much
Many people work in this exercise at too fast (so to speak, haphazardly) a pace, brought it together at the bottom point haphazardly, did not pause, did not contract the muscles, and haphazardly returned to the top point... you don’t need to do this, you need to do the opposite do everything slowly under control without any impulse movements, be sure to linger at the bottom point, squeezing the pectoral muscles for 2-3 seconds, then slowly stretch the chest muscles to the top point.
Don't go for weight in this exercise. NEVER!!! It's not compound, it doesn't build muscle, it's ISOLATION (it builds your pecs), so use weights that allow you to perform the exercise perfectly correctly, otherwise you'll either perform the exercise incorrectly, get injured, or both. Do you need it? ...
This is where I end this issue, I hope you found it INTERESTING and INFORMATIVE.
For dessert, a video: a visual and also explanatory demonstration of this exercise:
Best regards, administrator.
Crossover is the reduction of the arm in a block simulator. An isolated exercise to shape the pectoral muscles. It is well suited for athletes who have already gained basic pectoral muscle mass and need to polish it up.
The target muscles for this exercise are the pectorals. Depending on the variation of the exercise, it is possible to emphasize the load on their lower, upper or inner parts.
The pectoral muscles are targeted when performing the exercise.
The muscles of the shoulders, arms and back are used as additional muscles. A number of muscles in the body perform a stabilizing function. In particular, these are the muscles of the abs, legs and buttocks.
The advantage of crossovers
Performing exercises in a block simulator has its own specifics. As for such an exercise as a crossover, its main advantages are as follows:
- The pectoral muscles are under load all the time. The resistance of the blocks does not allow them to relax even for a second. While when performing chest exercises with dumbbells or a barbell, the effort is more of an impulse nature.
- By varying the position of the body and the direction of the information, you can work different areas of the pectoral muscles. So, for example, if we do a crossover from top to bottom, it works. If, on the contrary, we pull up the handles of the lower blocks, the emphasis is on. By doing the crossover directly in front of us, we are working on the center.
- The crossover technique involves stretching the target muscles at the top. This allows you to increase the range of motion and force the muscle to contract as much as possible.
- Because this exercise doesn't use heavy weights, it's much safer for your shoulder joints than, say, a bench press.
Execution technique
Often in isolated exercises, technique plays a more significant role than the weight itself. Crossover is no exception. Our task is not to load the muscle to the maximum (there are basic exercises for this), but to make it work so that it grows in the way we need. Well, or in the case of using exercises for finishing, we are working with an already tired muscle, so heavy weights are also irrelevant.
Let's look at the crossover in its classic form, leaving the variations for last.
- Set the required weight on the machine. It should be the same on the right and left. Use a load that will allow you to perform movements completely under control, without jerking.
- Stand straight between the posts, bend slightly forward with your back straight. Place your feet shoulder-width apart, knees slightly bent. Some athletes put one leg forward for a more stable body position when bending over. This approach has its place, however, when using it, it is necessary to alternate the position of the legs from approach to approach. This will avoid asymmetry of the load on the right and left sides.
- Raise your hands and grab the handles of the blocks so that you feel a stretch in your pectoral muscles. The elbows should be bent (this rule remains the same throughout the entire movement), the shoulder blades should be pressed tightly against the back. Lock yourself in the starting position.
- As you exhale, without bending your back or changing the angle of your elbows, slowly and under control bring your arms together below you in front of you. The insides of your wrists should be facing each other. Concentrate on maximizing the strength of your pectoral muscles. At the bottom of the exercise, hold for 1-2 seconds. You can even slightly move one hand behind the other (alternately) to increase the amplitude.
- As you inhale, raise your arms again to the starting position.
 The classic version of the crossover emphasizes the load on the lower chest.
 When performing the exercise, do not allow your elbows to straighten. The angle of about 10 degrees is maintained all the time. With the correct technique, the trajectory of the brushes' movement resembles a semicircle. The back should remain straight at all times. Shoulders should be straightened.
It is also important to control muscle effort and not allow yourself to work with your arms. We train specifically the pectorals, remember this. Avoid jerking - the movement is carried out evenly, the muscles do not relax for a second.
Variations for the top and middle of the chest
As already mentioned, classic crossovers mostly target the lower chest. In fairness, it is worth citing variations of this exercise, the combination of which will help to maximally polish the shape of the pectoral muscles from all sides.
In general, the technique for performing the exercise remains the same, only the position of the body and the direction of pull of the cables change.
Upper chest
When our task is to draw the upper contour of the chest, the handles will need to be pulled not from top to bottom, but from bottom to top. That is, the exercise is performed on the lower block.
 When using lower blocks, the load is redistributed to the upper chest.
 In the starting position, the arms are slightly bent at the elbows, lowered down to the sides of the body and slightly pulled back (until you feel a stretch in the chest). Palms are directed towards the body. As you exhale, you need to raise your arms and bring them together in front of you. While inhaling, return to the starting position.
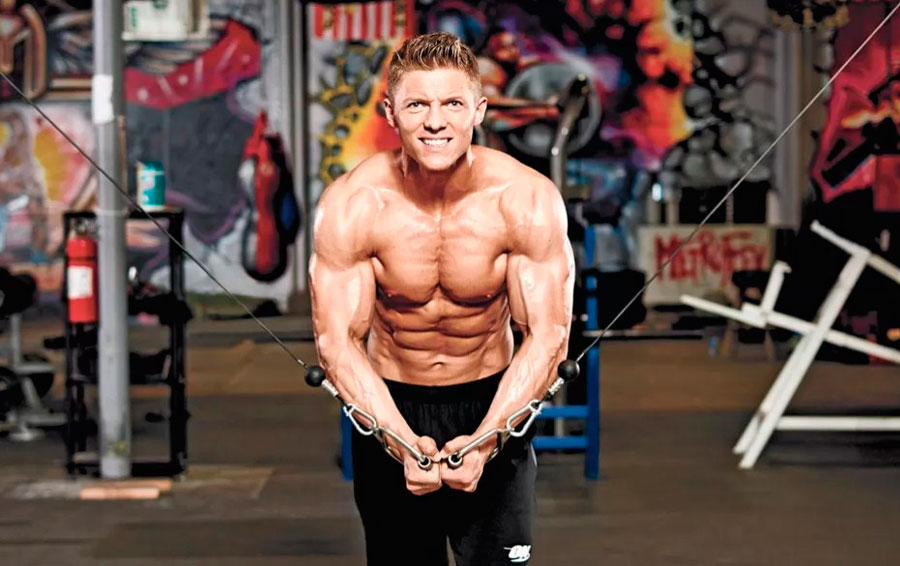
Mid chest
To work the middle of the chest, secure the blocks in the middle of the supports and perform the information directly in front of you. In this position, the arms at the end point will not be directed up or down, but forward.
 Working on the central part of the chest.
 You can also try a horizontal crossover. To do this, place a bench between the supports of the simulator. You lie down on it with your body and grab the handles of the blocks in the lower position. The load will be similar to what you get by doing. However, thanks to the resistance of the simulator, your muscles will not relax for a second, that is, the workout will be even more powerful.
 Execution on a horizontal bench.
 How to build a workout
You can add crossovers into your training program after heavier compound exercises. They should be performed in 10-15 repetitions, 2-3 sets with light or medium weight. The technique of movement is of primary importance.
You can also combine crossovers with push-ups, performing a set of both exercises without a break. That is, for example, you do 20-30 push-ups, then 10-15 push-ups at once, then rest - and the next approach.
The crossover crossover is an isolating exercise for the lower chest, which focuses on the lower chest. Those who want to have a beautiful “separation” of the pectoral muscle from the abs should do it at the end of the workout. Mixing in a crossover can be done both with the upper mount of the block system and with the lower one in order to engage the muscles at different angles. The movement is sometimes replaced by working in loops or with rubber, but for the classic “builder” cut of the pectoral muscle this movement is considered indispensable. The exercise is accessible to both beginners and professionals, and can be performed by both men and women.

It is important to determine where the handles are attached. Tall athletes can attach the pulley system to the uppermost clamp; with average height, it makes sense to lower it so that at the top point of the arm extension the shoulders do not lock in an uncomfortable position, and the athlete does not lose control of the core and chest muscles. If an athlete “throws up” during movement, he has chosen the wrong height of the clamp.
The handles used are curved or D-shaped. If there are no such handles in the gym, you can put on two round clamps and perform the movement with slight resistance by gripping the round clamps.
When taking the starting position, it is important not to injure yourself. First, grab one handle and bring it to the belt, then the second, after which you need to position your body in the center of the crossover so that the cables are tensioned equally. A stable stand “in scissors” or on two legs in an inclined position is allowed, this is not important.

The exercise involves bringing your arms together in front of you, at waist level. During work, you should consciously tense your chest muscles and not relax them for as long as possible, spreading your arms to the sides towards the block mechanisms.
All repetitions must be performed in the same manner so that the athlete does not change the trajectory of movement. A deepening of the back tilt is not allowed. It is often written that it should be strictly 45 degrees, but this is not so, the depth of the inclination is determined by the anatomical features of the athlete, and cannot be deeper than 45 degrees. A straight vertical stand is also not allowed. Otherwise, options are possible that will allow the athlete to work out the muscles more efficiently.
There are technical issues that are best avoided:
- Cheating with the body. You are not in Plush Beard's video, avoid swings, as they can injure the shoulder joints, even if the athlete does not feel pain or discomfort during the swing;
- Active pushes with hands. Bodybuilding differs from weightlifting in that it loves controlled exercises. By pushing the weight we can lift more, but the goal of the movement is not to set a gym record on the cable machines.
- “Running” around the perimeter with your feet. It is worth standing up once so that the body position is strong, and not changing it, since “jogging” can cause a loss of shoulder stability and cause injury;
- Head nods. It’s unpleasant when your neck gets jammed during exercise. And it’s even more unpleasant when this “wonderful” feeling is accompanied by a shoulder injury. Therefore, excessive tension in the trapezius and nodding should be avoided. If you need to nod your head at all costs, the weight is chosen incorrectly, it is too heavy. Again, the weight must be selected so that there is no need to make additional and unnecessary movements of the body and head.
- "Disruption" at the start. Jerking with your arms can cause injury to both the shoulder and elbow joints;
- Rigidly “inserted” elbows at the start of the movement. This can cause hyperextension of the elbow ligaments and cause injury;
- Constantly putting the same leg forward can lead to imbalances in the hip joint.
Execution options
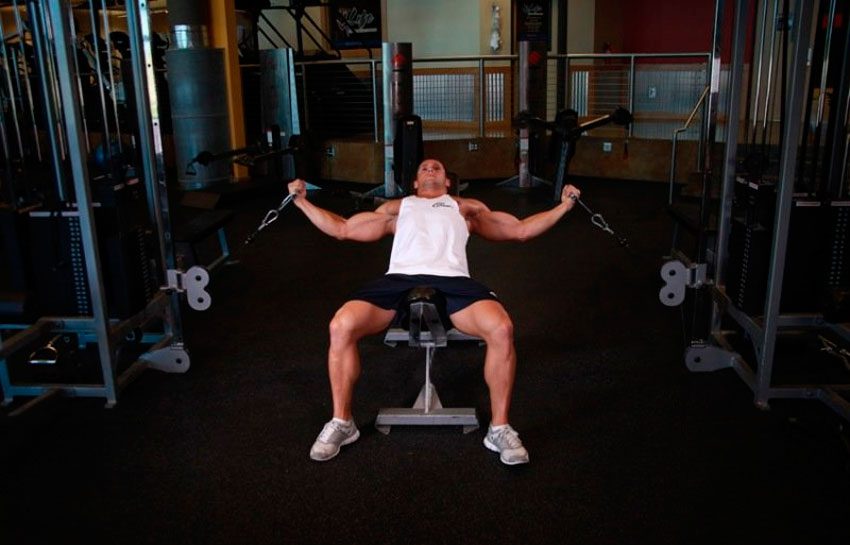
The exercise is reminiscent of the well-known dumbbell fly, but instead of dumbbells, you hold crossover handles in your hands. The cables are attached to the lower part of the fastening sector so that the athlete’s arms are not “twisted” when taking the starting position. The bench can be horizontal or inclined; this is of no fundamental importance. It is believed that the pecs work more on the incline bench, but this is subjective and depends on the body type.
The bench is located strictly in the center, the athlete lies down on it, the assistant places the handles at the level of the center of the chest. Further, the movement resembles a regular “fly” with dumbbells, the arms are directed to the sides and brought to the center at the level of the middle of the chest. There is no need to allow an unnaturally large amplitude to avoid dislocating the shoulder joint.

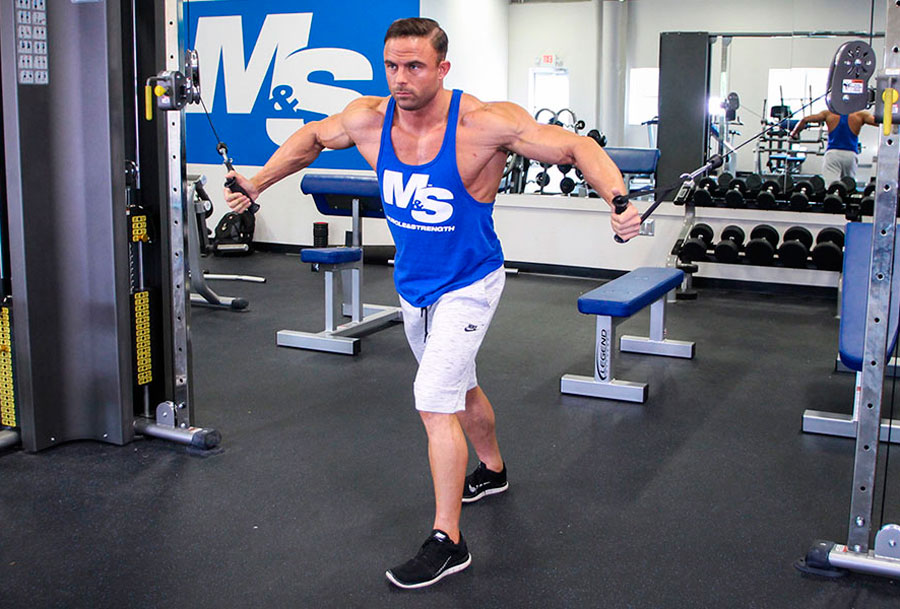
Actually, they resemble the version with a split leg, but you need to stand up straight and not put your feet in a split leg. The body leans forward, the arms are lowered down, the pectoral muscles are tensed, the work is done by contracting the chest.

This movement requires a little more work from the anterior deltoid. You need to perform the exercise by attaching the handles to the bottom of the crossover. Then the athlete takes a step forward and brings his arms to chest level. This is followed by mechanical reduction of the arms at the level of the middle of the chest. The pectoral muscles contract at the point of maximum tension.
Analysis of the exercise
Anatomy of exercise - which muscles work

The main target group is the lower bundle of the pectoral muscle. The muscles of the back and core work as stabilizers; the anterior deltoids, serratus muscles, and the pectoralis minor muscle help with movement.
pros
This is a completely isolation exercise. It does not allow the triceps to be involved in the work, which means it is suitable for those who bench press a lot and consider the bench press their priority. The movement allows you to work the pectoral muscles without putting much strain on the stabilizers and biceps, allows you to achieve a greater amplitude, and stretch the muscles so as to shorten them as much as possible. The exercise is varied enough to avoid increased stress on the elbows, shoulders, and biceps. It helps to work the entire length of the muscle and allows you not to exclude the lower pectoral bundle from the work.
Minuses:
- Not all halls are equipped with a crossover, and there is not always access to it. This is a popular car and can be constantly busy during rush hour;
- Movement cannot help build muscle if it is all you do. Basic exercises required in addition to crossover work
Typically, the crossover is not the first movement in a workout, and is not used as an exercise to pre-fatigue the chest muscles. The training begins from the base, and only at the end the athlete approaches the block simulator to work the lower chest.
This means that joint warm-up is not necessary; it is enough to perform a couple of approaches with light weight.

- The exercise is single-joint - the work is done only in the shoulder joint;
- Cheating and body swings are excluded;
- The elbows in the upper phase should not be raised towards the ears, they are in the plane of the shoulder;
- The muscles must be consciously tensed, as if “bringing” the weight to the desired position;
- You can’t throw your head back, look at the ceiling, you should relax your neck and look forward;
- You need to use a stable body position, preferably a scissors stance;
- Work occurs along an elliptical or arcuate path. You should not “throw your arms up” by bending them at the elbows;
- The reduction is carried out approximately at waist level;
- It can be assumed that the athlete uses a small weight, but it is impossible to use pushes and jerks along the trajectory, and relaxed arms when lowering the weight;
- You need to try to consciously exclude working with the trapezius muscles
Muscle contraction is performed by exhaling, exhaling with effort - the basic rule when performing strength exercises.
Errors
- “Different” movements, when the athlete bends his arms at the elbows in the first repetition, and changes the position of the body in the second, and carries the weight differently;
- Body swings that help with weight work;
- Throwing weights;
- Relaxed and rounded back;
- "Inserted" straight elbows

Most often, bodybuilders advise consciously contracting the pecs at the lowest point. This can be achieved through a little isometry, and this, in turn, by slightly turning the palms towards each other at the bottom point of the exercise.
You can achieve maximum isolation and completely eliminate cheating by kneeling. This version of the starting position will allow the athlete to completely eliminate body swings.
If you need to shift the emphasis to the upper chest, you need to bring your arms higher. This can be achieved both by changing the angle of inclination of the body and by changing the fastening.
If you work “crosswise”, placing one hand behind the other at the bottom of the amplitude, you can achieve a strong muscle contraction without changing the amplitude.
Inclusion in the program
This exercise can be the only one on the chest only if we are talking about training a woman with breast implants. All other athletes should perform the movement at the end of the workout, after basic and other isolation exercises.
Usually performed in 12-15 repetitions in 3-4 sets, and the warm-up does not count as work. The exercise is not performed with heavy weight, so the rest can be quite short, about a minute between sets.
Contraindications
The only contraindication to this exercise is an unhealed tear or separation of the pectoral muscle. In all other cases, you can carefully follow the information. If you have a rotator cuff injury, you may need to completely eliminate weight-bearing on your chest for a while, including crossover work.
How to replace bringing your hands together in a crossover
From a biomechanical point of view, a complete replacement means bringing your hands together with rubber expanders. But from the point of view of muscle work, this is an incomplete replacement, since expanders provide resistance differently than blocks. They allow the muscles to contract more strongly at the peak point, but allow the ability to relax as the weight lowers.
The crossover crunch is a classic bodybuilding exercise that every athlete should do correctly.
This is an isolated exercise that perfectly pumps the chest. It differs from dumbbell flyes in that there is constant tension in the chest muscles throughout the entire amplitude of the exercise and allows you to better work out the inner part. Crossover crossovers place less stress on the elbow joints than dumbbell flyes.
Depending on the tilt of the bench, different muscles work:
- lying on a bench upside down puts more stress on the lower pecs;
- lying on a horizontal bench loads the middle of the pectoral muscles;
- Lying on a bench at an angle of 30-40 degrees loads the upper chest.
Initial position
Take a bench that suits you and place it in the center of the crossover. Lie on a bench so that the middle of your chest is level with the middle of the blocks. Place your feet shoulder-width apart and rest them on the floor. For a more isolated option, raise your legs up, place your heels on the bench or keep them crossed, the weight in the machine that you will lift will be less, but the isolation on the pectoral muscles will be much greater. Another option is to press your lower back completely into the bench, this will increase the isolation of the pectoral muscles and remember to elevate your legs on the bench. The back, pelvis and neck are pressed against the bench, the shoulder blades are together, the lower back and legs are in the position of your choice. Grab the handles of the crossover and bring them together; if you feel uncomfortable, ask them to hand them to you. Only D-shaped handles should be used. Take the handles in a lock, with your palms facing each other. Bend your arms slightly at the elbows and keep it that way throughout the entire exercise.
Technique for performing crossover exercises while lying on a horizontal bench
We start the exercise from the top position. Inhale and begin to lower the handles down in an arc. You should lower it until the handles are at the level of your shoulders. The elbows look down and are always half bent. As you exhale forcefully, bring your hands together. As if hugging a small barrel on your chest. Hands should touch at the top point and stay there for a short period of time. Tighten your chest and lower.


