Instructions for installing bindings on cross-country skis. How to properly install bindings on skis Solomon bindings for cross-country skis installation
Ski bindings are the most important elements of an athlete’s equipment, on which his safety will depend. It is very important to install them correctly. This can be done either with your own hands or in a workshop. This article provides information about the main types, provides instructions on how to remove bindings from skis, and how to install bindings on skis yourself.
According to design and purpose, there are 4 types:
- Soft.
- Tough.
- Semi-rigid.
- Mountain.
Soft (simple) is a loop made of leather or fabric into which the foot is placed in ordinary shoes - a boot or felt boot. Sometimes, for a more secure fit, an additional strap is used that wraps around the heel. Such loops are usually installed on skis for children or on hunting skis.
Semi-rigid consists of metal cheeks, a sling that holds the boot on top and a strap that wraps around the heel. Previously, they were part of the winter equipment of military personnel. Currently, they are often installed on children's models.
Semi-rigid ones come in three types: cable, spring, and with swinging cheeks. The third type is the most convenient. Unlike the first two, they do not damage shoes, are reliable, and are easy to fasten and unfasten. Well suited for long hiking trips. They do not require special shoes, but they fix the boot much more rigidly than simple ones.
The most popular are the hard ones. There are three systems of this type:
- Nordic Norm 75 (NN 75).
- Salomon Nordic System (SNS).
- New Nordic Norm (NNN).
Nordic 75 is a welt system with a spring-loaded shackle and a locking mechanism. The boot has 3 or 4 holes on the sole, with which it is installed on protruding rods. Then the edging of the boot is pressed with a metal arch. The NN 75 is usually mounted on wooden cross-country skis.
Since this design does not fix the heel at all, it cannot be used for skating.
NNN and SNS are the most common designs designed for plastic cross-country models and roller skis. They have various models and modifications designed for any level - from amateurs to world-class athletes. Installing SNS and NNN ski bindings yourself will not take much time. The difference between these types is the number of longitudinal guides for fixing the boot.
Both systems can be of three types:
- Mechanical.
- "Machine".
- "Semi-automatic."
New Nordic Norm was developed by Roteffella. Due to the fact that the front bracket is moved back, this design is more suitable for skating.
The device is a plate with a double profile that holds the sole. Fixation is carried out using a transverse rod. The boot rests against a rubber stop. The rigidity of the stop determines the rigidity of the entire structure. The stops are painted in different colors (white, green, black, red), which determine the degree of rigidity.
There are several upgrades to NNN. One of them is NIS (Nordic Integrated System). It is characterized by ease of installation and the ability to move the boot along the longitudinal axis.
Salomon Nordic System was developed by Salomon. This device has only one guide. In the front part there is a rubber stop, the rigidity of which can also vary. There are two main types:
- SNS Profile
This type is universal. It can be used for both skating and classic skating. - SNS Pilot
Usually used for skating.
Alpine ski boots differ from other types in that they completely fix the shoes and are also able to come off when the athlete falls.
There are 4 main types:
- Alpain.
Suitable for skiing on prepared trails. - Frame.
The front part is connected to the back using a frame. Allows you to fully secure your foot on the descent and release the heel for going uphill. - Pins.
The boot is secured using 4 pins. - Telemark.
Frame and pin ones are suitable for both skiing on prepared trails and freeride.
Installation instructions
For installation you will need the following tools and materials: marker, screwdriver, drills, ruler, glue, awl.
Center of gravity
Installation of all structures begins with determining the balance line. The leading edge of the shoe should be on it. Sometimes the center of gravity is already marked by the manufacturer, but it is better to determine it yourself. To find it, you need to place the ski on a narrow object and move it until it reaches a balanced position. The balance line should be noted. This line will be the axis of the bracket for NNN and SNS type devices. For NN 75 it will determine where to install the screws.
Marking
Marking can be done using a special conductor, or, if it is not available, using a paper template.
Be sure to check the correctness of the markings by measuring the distances between the marks. In NNN systems, the fastener is located closer to the front end relative to the balance line, and in SNS systems directly on the line.
Drilling holes
It is recommended that you follow the instructions included with the kit to determine the required hole diameter and depth. For SNS and NNN systems, holes are usually drilled to 10 mm. You need to remove dust from the finished holes, then fill them with glue. This will ensure a more secure fixation of the screws.
Assembly
After this, the device should be applied to the marked holes and begin to tighten the screws evenly. Care must be taken not to displace it relative to the longitudinal axis. For NN 75, it is recommended to check the alignment accuracy before screwing. You can go out on the track after 12 hours, when the glue has dried.
If you need to install old fasteners on new equipment, it will not be difficult to remove them. Disassembly should begin from the rear. First you need to carefully remove the plug from the screw and unscrew it. Then remove the bar and unscrew the two bolts underneath it. The last bolt is also located under the plug.
How to install a mount on skis of mountain modifications?
Installing bindings on such skis is practically no different from installing them on cross-country skis. This work is performed in several simple steps.
First, the center of gravity is found as described above. Then you need to lay the fastener so that its leading edge exactly matches the balance line, place the boot in the clamp and align it. After this, you should carefully mark the holes with a pencil or awl and drill them. Then attach the front part with screws. The back part is installed in the middle position and the holes are marked. Holes are drilled and the back is secured with screws. The installation ends with configuration.
Recently, some models have been produced with pre-installed platforms, onto which it is easy to install latches without fixing them with self-tapping screws. This makes it possible to reinstall it for a different shoe size, as well as the possibility of displacement along the longitudinal axis.
The choice of bindings depends on the skiing style, as well as the level of preparedness of the skier. It is recommended to buy products from trusted well-known companies such as Salomon, Fisher, Atomic. The products of these manufacturers are reliable and high quality.
Popular wisdom: "Seven measure once, cut once"
1. SNS and NNN mounts can also be used to find the center of gravity. We use the flat side, like a ruler, and place the end side on the floor. We place the ski perpendicularly from above like a scale, moving it longitudinally to achieve balance. With a weighted binding, it is measured by attaching the binding to the ski, while ensuring that the axis of the center of gravity passes through the locking groove of the boot, moving the ski and the binding itself along.
2. Having found the center of gravity, mark perpendicular vertical lines on the ends of the skis on both sides of the mount to the upper side of the ski and connect them. This can be done using a square, although an error of up to two millimeters is acceptable for this length of skis. After this, we perform the same procedure with the second ski.
3. There is no difference between the boots of the new model with fastening directly at the front edge and the old model, where the fastening is on the ledge - for both, the axis of the center of gravity is located at the front edge of the boot. It turns out that in old boots the protrusion extends beyond the axis of the center of gravity. The planned running style also does not matter. The main thing is that when suspended, the ski does not weigh either in front or behind. The only exceptions are skiers with experience, who, to “increase speed,” shift them slightly back from the axis of the center of gravity. But putting this into practice requires experience.
4. Modern ski bindings such as SNS and NNN have a transverse groove for fixing the metal shaft of the boot in the front part. This groove must be aligned with the drawn axis of the center of gravity. Directly below the groove in the center there is a longitudinal groove. The middle fastening element is then inserted into it. Its lower bottom part coincides with the center of the rod, and we combine it with our marked line on the upper side of the ski.
5. First you need to unscrew all three screws that are not completely screwed in from the fastening. If the automatically latching SNS Profile Auto is closed, and you cannot get to the third screw, then you need to press the bracket (the latch will move inward), after which you need to insert a thick screwdriver or other suitable tool to prevent the latch from returning. Then we fold back the bracket to gain access to the screw. A similar procedure is carried out to remove the binding from skis.
6. Next comes fitting to the skis according to the marks and marking future holes in the center using an awl. After removing the fasteners, you need to check the middle mark exactly in the middle using a caliper or tape measure. The two back holes should be equally distant from the edges. To make corrections, use an awl to make new marks deeper.
7. Before drilling, we advise you to play it safe and check the depth of the screw entry so as not to pierce the ski through. We subtract the mounting height and try the rest on the ski. If the ski is thin and the length of the standard screws is excessive, then you need to replace them with screws of the required length.
8. On the drill, mark the depth of the planned hole by winding insulating tape if there is no ruler on the drill. The drill bit should have a diameter of 3.6 to 4 mm depending on the thickness of the screws. Then we carefully drill six holes on the entire pair of skis. Why carefully, because today skis have a fiberglass honeycomb filling under a few millimeters of wooden insert for bindings. Therefore, the drill, despite the limiters made of insulating tape or a ruler, can easily slip through under pressure. Do not put pressure on the drill while drilling. The skis must first be pressed with your foot or secured with a clamp to avoid the spring factor. It is necessary to drill strictly vertically, without distortions, without rocking the drill, achieving a clear shape of the holes.
9. Having drilled three holes for each ski, remove the plastic brackets that unfasten the skis, attach the fasteners to them with screws, having previously tightened them no more than halfway, this will make alignment easier. Then using a screwdriver we tighten them with a little force, there is still a certain risk of tearing them off. Checking the tightness of the connection. Nothing should be loose.
Note: Do not use glue, as it is only suitable for wooden skis, and the mass of them has a negative effect on modern internals. A thick six-millimeter screw tightly closes the hole and prevents moisture from entering. And the edges of the screws have time to wear off before anything can rot inside the ski.
10. Reinstall the removed bracket by inserting the lower end into the loop, then pressing the bracket down firmly until it clicks. Carefully! Don't get your fingers pinched. Next, we assemble the fastening elements, first removing the screws - there are two in the middle element, and one in the last one. We install the elements end-to-end, covering the previous screws. We mark the holes in the same way with an awl, remove the elements, drill, fasten the screws, installing the fastening elements end-to-end until they stop. After screwing the last “thrust bearing”, the hole is closed with a plug.
Good luck on the ski track!
Bindings are an important element of ski equipment. As a rule, the installation of bindings is done by the store, but some skiers prefer to do it themselves. Let's find out how they succeed.
Types of ski bindings
There are three types of ski bindings:
- Hard (welt) – Nordic Norm 75 mm.
- Semi-rigid – straps, elastic bands and buckles.
- System:
- SNS Salomon
- NN Rotofella
Since the first two types are gradually going out of use due to their total imperfection and moral obsolescence, there is no need to talk about them. It is much more interesting to talk about system fastenings.
It is worth noting that if a skier decides to install the NN 75mm, the installation instructions below will suit him.
Systems from Salomon and Rotofella
These fastening systems have a different number of longitudinal components, functionality and boot stabilization indicators, and are also available in various modifications. They are great for cross-country skis, the most common type in skiing.
- Rotofella system NNN appeared a little later than NN 75mm. The boots are fastened and stabilized here thanks to two longitudinal guides. The functionality of these mounts is not inferior to NN.
- In the Salomon SNS system Only one hinge mount is used. Due to the peculiarities of the sole of the boots designed for such bindings, the athlete can control the ski while performing any move. This is the most modern version of ski bindings.
There are no significant disadvantages or advantages between these systems. They are more convenient, more practical and more modern than their predecessors, so they cost a little more.

How to install bindings on cross-country skis yourself
To install the fasteners, you will first need the following equipment:
- Cross-country skis and bindings for them;
- A paper template for marking or a jig;
- Screwdriver (cross bit + drills 3.4 – 3.6 mm);
- Marker;
- PVA glue;
- Ruler;
- Awl.
Installation instructions
Installation of ski bindings occurs in several stages.
Step 1: Center of Gravity
The first step is to determine the center of gravity of the skis. To do this, the ski is placed on the edge of the ruler and moved along this surface until the skis freeze, like balanced scales, parallel to the floor.
The center balance lines must be marked with a marker. The marked line will coincide with the axis of fastening the bracket.
Step 2: Marking
The next step is to mark the holes on the ski area. This action is carried out using a paper template, which is usually supplied with the fasteners. If you don’t have it on hand, it doesn’t matter, you can download it from the Internet, or mark the ski using an awl, attaching the assembled mount so that the center of gravity coincides with the axis of fixation of the shoe.

In this case, in the NNN system the holes are located in front of the axis of the center of gravity, and in the SNS the axis lies directly under the mount. For professional marking, a conductor is used.
Step 3: Drilling Holes
Before drilling, you should check the distance between the holes located on the mount with the distance between the points marked during marking.
Holes for Rottefella are drilled with a drill with a diameter of 3.4 mm, and for Salomon - 3.6 mm. The depth of the holes is 10 mm. Drilling is performed at medium speed with light pressure. To ensure reliable fixation, the finished holes are blown and then filled with glue.
Step 5: Assembly
Now that the holes are ready, you need to attach the fasteners and tighten the screws tightly. After which the ski is left to dry (about 10-12 hours).
The cross-country skis are now ready for use. As you can see, there is nothing difficult about this. The main thing is to be careful and attentive, as well as to have all the necessary tools.
Abstract. Detailed description of installing bindings on cross-country skis. Video at the end of the note. You can download a markup template for installation.
It so happened that my old ski boots with 75 bindings broke. Naturally, I wanted to move to a new level of progress and install modern ski bindings. And then my son had some good extra Salomon boots for SNS bindings. I didn’t have to worry about choosing fasteners and they were purchased for 800 rubles. The exact name is Salomon SNS PROFIL AUTO MEN.
These bindings are marketed as: “Comfortable touring bindings with flex characteristics targeted at male skiers.” Just what the coach ordered.
Because I remembered that I had drills, a drill, an awl and a screwdriver at home, so I politely refused the offer to install the fasteners in the store. Moreover, the box contained instructions in 10 languages.
We install ski bindings ourselves.
At home, when I started studying the instructions, I discovered an interesting point:
Installation of fasteners.
“Your bindings must be properly installed on your skis by a certified professional at your Authorized Salomon Dealer shop or service center in accordance with the instructions and recommendations in the latest edition of the Salomon Cross Country Ski Technical Manual. Failure to follow this rule increases your risk of injury while riding.“.
That's it, not a word more about installation. I also read useful advice from this manual that when fastening on uneven terrain, you should tie the ski to your right or left leg to avoid losing it. By the way, very wise.
The remaining points, as usual, are complete reinsurance of the manufacturer against various legal claims of a spoiled Western consumer.
Based on the lack of that same manual, I had to remember my carpentry and plumbing skills from labor lessons and install the fasteners myself. Anyone who worked hard at school and then managed to consolidate the skills of marking, drilling and driving screws in everyday life should be able to cope.
Here is a set of tools that we will need. You can use a Phillips screwdriver to drive screws. But it’s much better to have a special PZ3 bit that costs 35-40 rubles. The bit has a blunt tip and fits tightly into the cross of the screw. When driving screws with a regular Phillips screwdriver, you need to press it firmly so that it does not slip.

The RZ3 bit will make it easier to drive screws
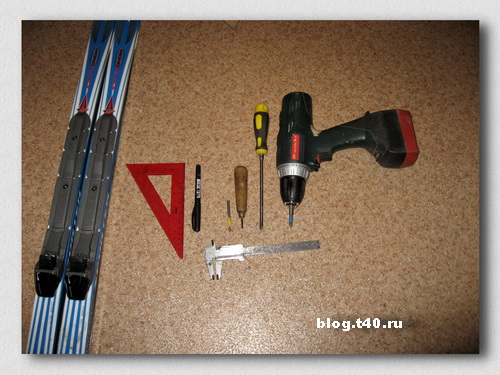
Tool kit for self-installation of fasteners
Our main task is to establish the axis of attaching the boot to the ski strictly at the center of gravity of the ski. Professionals can move the mounts to one side or another from the CG. Fans of Sunday ski trips have no need for such troubles.
First of all, I dismantled the old 75 mounts. There were three holes left from them, which did not interfere with the installation of SNS mounts.

Find the center of gravity of the ski. To do this, we use the thrust bearing from the fasteners themselves. After several unsuccessful attempts, this center will be found. We make a line with a felt-tip pen.

Using a square, we draw a perpendicular to the side edge of the ski.
Above this line there should be a rod that is on the sole of the shoe.

Draw a perpendicular through the center of gravity
We apply the mount so that the clamping point of the boot shaft is above the center of gravity of the ski and carefully use an awl to prick the center of the front hole. We do this maneuver very carefully. One day, I was installing a mount and drilling three holes at once. As a result of inaccurate drilling, the heel of the boot was slightly shifted from the center of gravity and nothing could be corrected.

So now, I decided to drill the front hole in the center first. Screw the mount onto one screw, try on the thrust bearing and then mark the other two holes.
The front hole should be located strictly along the centerline of the ski and at a distance of 35 mm from the center of gravity. I found this out later, having found this markup template from Salamon on the Internet.
We select a drill. We take the screw from the kit and use a caliper to measure the diameter of the screw shaft.

This is the drill you need to use to drill the hole. There are tips to drill with a 3.6 mm drill. http://www.skiline.ru/sport-technology/169-ski-binding-mounting. But it's somehow risky. Too much tension in the hole can lead to cracking of the ski. According to classical carpentry canons, the diameter of the hole should be equal to the diameter of the screw shaft. I decided to go 50/50 and drilled with a 3.8mm drill. In order not to drill through the ski, we place an emphasis on the drill using insulating tape.

You should first make sure that the length of the screw is not too long and it will not come out from the sliding side of the ski.
We drill a hole, trying very hard to keep the drill perpendicular to the ski. Here a screwdriver or electric drill is preferable to a hand drill.
When drilling, do not press too hard on the drill. We remember that a ski is a layer cake and its filling is not very strong.
We place the mount on the first screw. We apply a thrust bearing. Carefully align the mount. Holding the front part, remove the thrust bearing and mark two other holes.

Do not snap the front mounting bracket. The front screw is located under it. The fasteners are in the box with the bracket not latched. As a rule, everyone starts turning the mount and snaps the bracket.
If the bracket is accidentally snapped, then we do this. We insert one screwdriver with a rod diameter of 4 mm into the groove where the boot rod is inserted, and with the second screwdriver we carefully pry the bracket up. It is better to remove it and put it aside until the end of installation.

I install the screws without glue. The tension in the hole is very good and in my opinion there is no need for glue.
We do the same with the second ski.
The process of installing the ski binding is shown in more detail and in dynamics in the video. Here I installed the SALOMON SNS SKATE skating bindings on new skis.


